Workflow overview
FretTrack is built around the repair job. A normal shop workflow starts when a customer contacts the shop or drops off an instrument, then moves through intake, documentation, repair notes, parts, scheduling, customer communication, completion, pickup, or shipping.
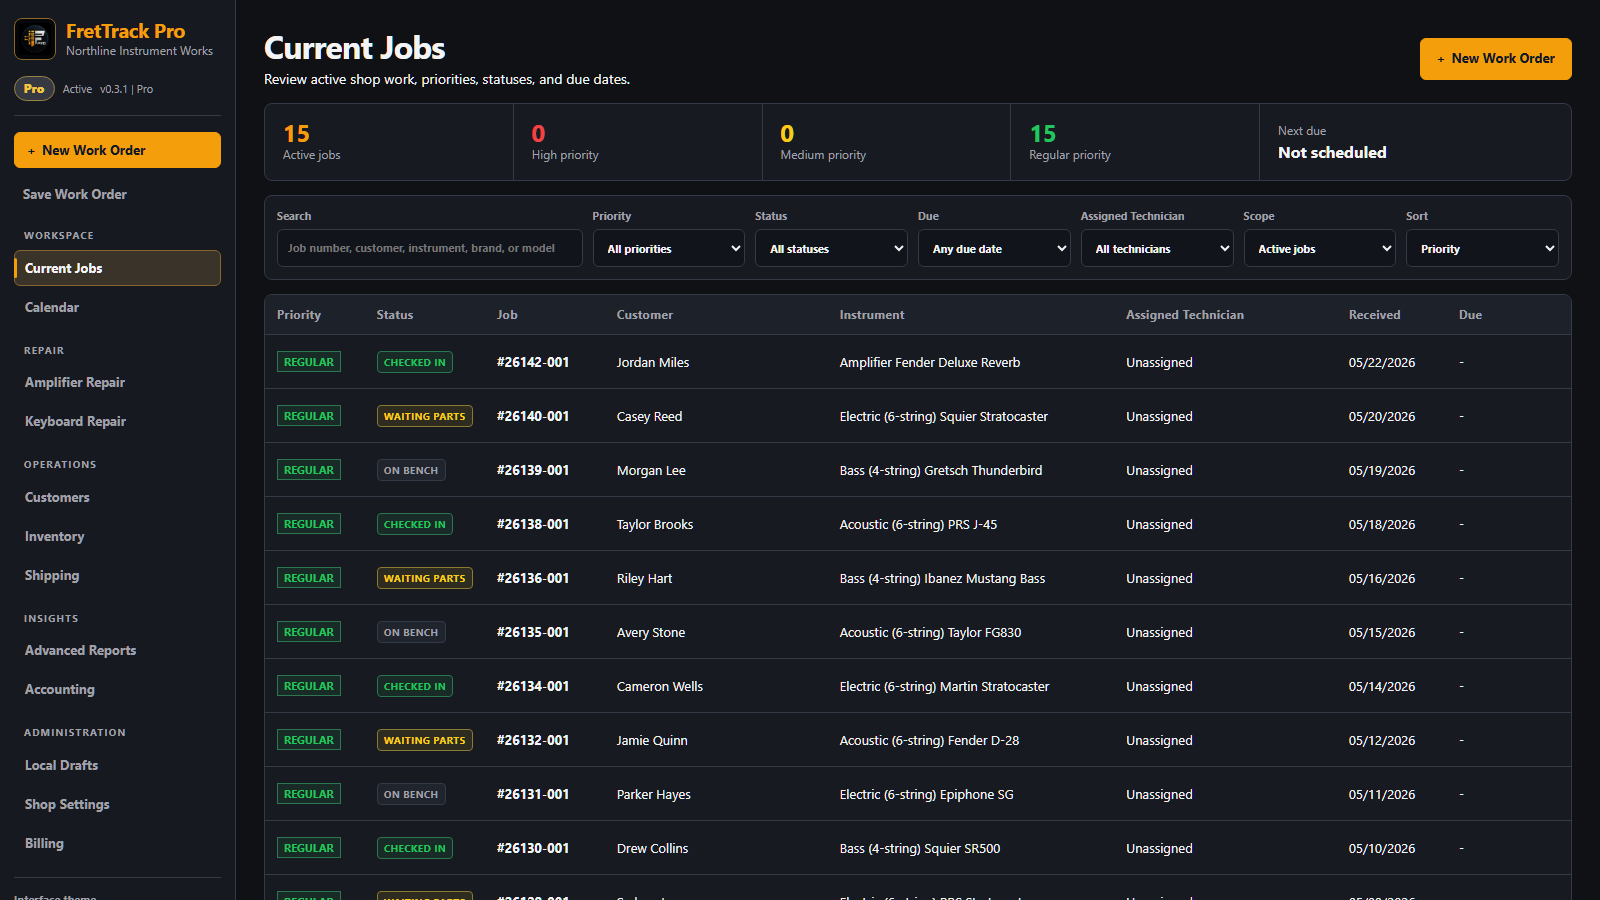
Screenshot shows fictional shop and customer data.
| Step | What you do | Why it matters |
|---|---|---|
| 1. Customer | Create or select the customer record. | Keeps contact details, preferences, and job history tied together. |
| 2. Intake | Create the job and enter instrument details. | Creates the shop record for the repair. |
| 3. Condition | Add photos, serial number images, and damage notes. | Protects the shop and gives the customer a clear record. |
| 4. Work | Add work logs, update status, assign parts, and record approvals. | Shows what happened, who did it, and what still needs attention. |
| 5. Schedule | Add promise dates, pickups, follow-ups, and shop blocks. | Helps the shop see workload and deadlines. |
| 6. Finish | Review notes, photos, parts, totals, and customer documents. | Creates a clean handoff for pickup or shipment. |
The best habit is simple: if it matters to the repair, the customer, the instrument, inventory, or another staff member, put it on the job.
Sign in and shop access
First access
- Go to app.frettrack-app.com.
- Create an account or sign in with your shop email address.
- Open the confirmation email and verify a newly created account.
- Create your shop to begin the 14-day Pro trial, or choose a shop that invited you.
- Open the main workspace.
If you do not see your shop
- Confirm you used the same email address that owns or was invited to the shop.
- Check that your email verification is complete.
- Refresh the page after confirming your email or accepting shop access.
- Try signing out and signing back in.
- Contact your shop owner or FretTrack support if you still cannot see access.
Protect your account with MFA
- Open Shop Settings and scroll to User → Authenticator protection.
- Choose Set Up Security Key to register a compatible hardware key/passkey for passwordless sign-in, or choose Set Up Authenticator App for TOTP codes.
- For an authenticator app, scan the QR code (or enter the manual setup key), then enter the current six-digit code to verify it.
- For a security key, follow the browser prompt to insert, tap, or unlock the key.
- On later sign-ins, use the enrolled security key or enter a current authenticator code when prompted.
This protects the individual FretTrack account and is available on every plan. Each person should enroll their own factor. Never share a security key, QR code, setup key, or live six-digit code. Security-key enrollment requires a compatible browser; if all enrolled factors are lost, contact support.
Create a new job
Use New Work Order when an instrument arrives for setup, repair, inspection, modification, or evaluation. The intake is grouped into Customer, Instrument, Shop workflow, and Customer request so the counter flow follows the decisions staff make.
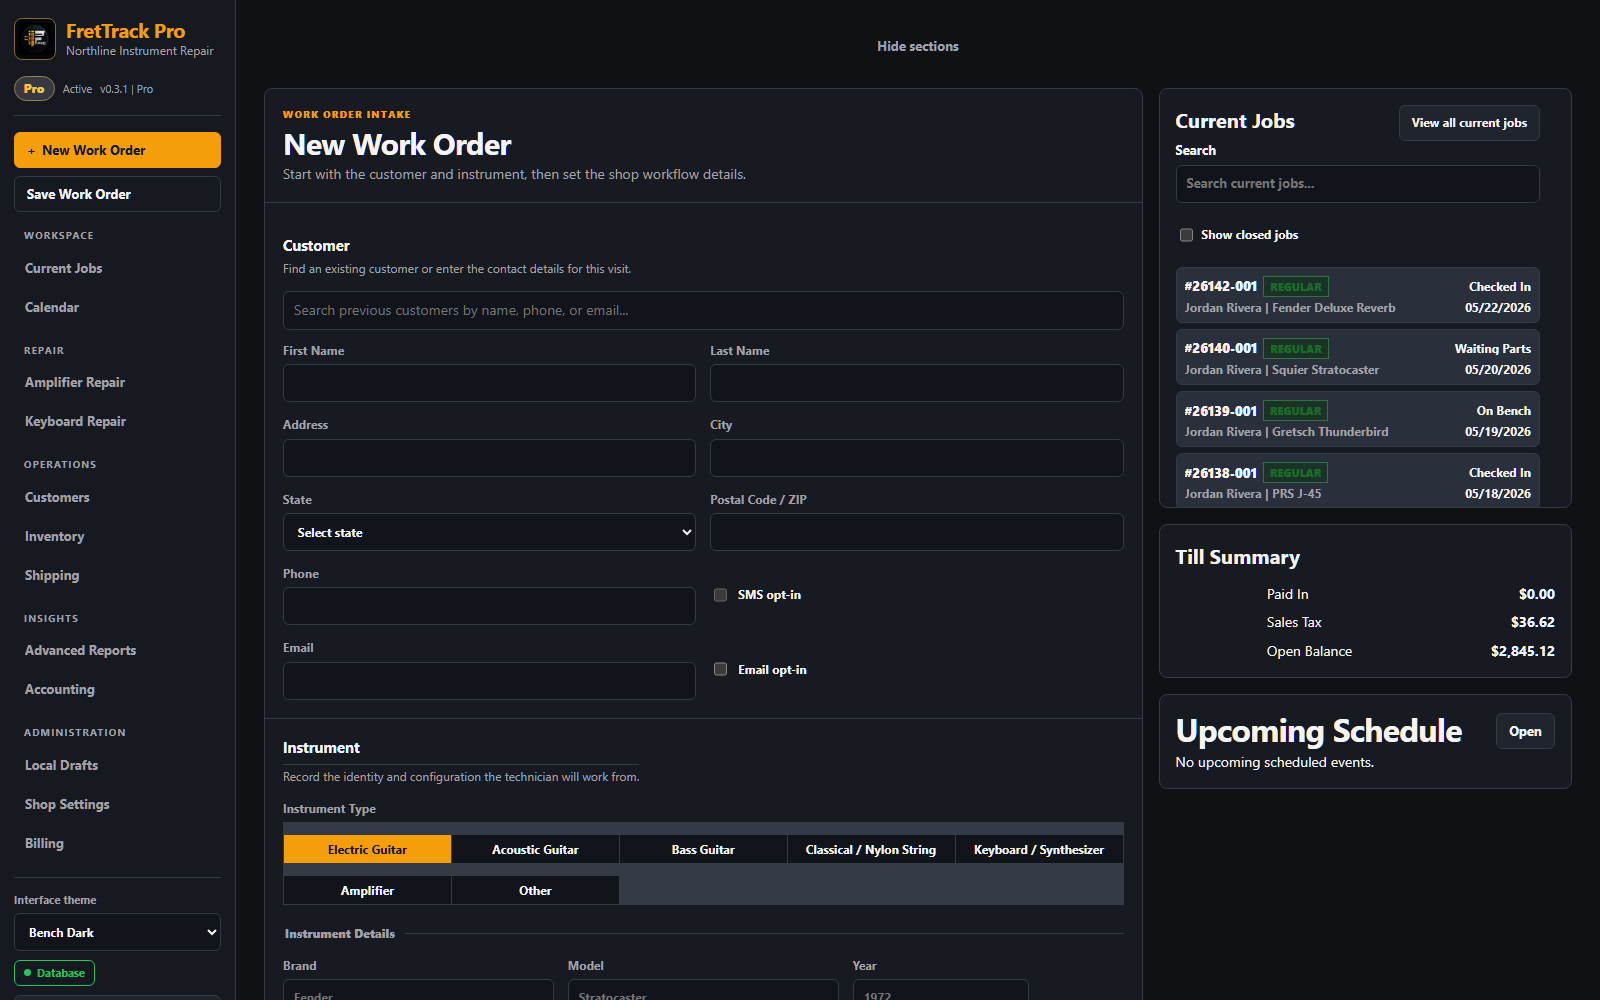
Screenshot shows fictional shop and customer data.
Recommended intake order
- Open New Job.
- Search for an existing customer before creating a new one.
- Enter customer contact details and communication preferences.
- Choose instrument type, brand, and model.
- Add year, serial number, color, finish, and orientation when available.
- Write the requested work in plain language.
- Select Date Received, Promise Date if one was given, job source, and priority.
- Add photos and damage documentation before work begins.
- Save the job before leaving the page.
Full setup with 10-46 strings. Check fret buzz around 7th fret. Replace output jack if needed. Customer says bridge pickup cuts out.
Bad example: Fix guitar.
Instrument details
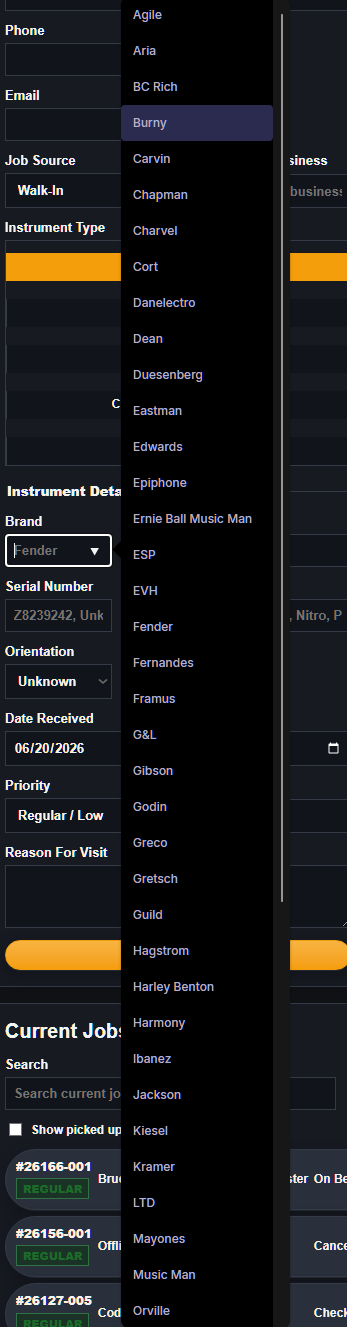
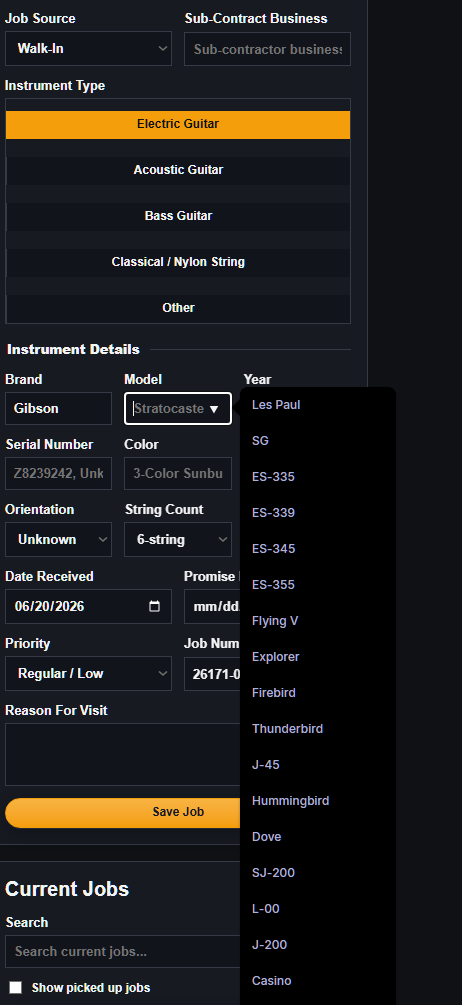
Instrument details help the shop identify exactly what came in. The brand and model fields support suggestions, but custom entries are allowed for boutique, vintage, imported, modified, or unusual instruments.
Fields to capture when possible
- Instrument Type: Acoustic, electric, bass, or the closest available type.
- Brand and Model: Use suggestions for common instruments or type the exact customer instrument.
- Year: Use a year, decade, Unknown, or other shop-friendly value.
- Serial Number: Add the serial number when readable. If not readable, say Unknown or Not provided.
- Color and Finish: Use clear free text, such as 3-Color Sunburst, Natural, Satin, Poly, or Nitro.
- Orientation: Right-handed, left-handed, or unknown.
Manage jobs after intake
After a job is created, the job detail screen becomes the main record. Use it to update status, add notes, document work, attach parts, review photos, and prepare customer-facing documents.
During repair
- Update the status when the job moves into active work, waiting on parts, waiting on customer, ready for pickup, or complete.
- Add work logs each time something meaningful happens.
- Add parts from inventory when stock should be reduced.
- Use manual parts only when the item should not affect inventory.
- Add schedule events for due dates, pickups, or follow-ups.
Before completion
- Review customer and instrument information.
- Confirm requested work and final work notes.
- Check photos and damage documentation.
- Confirm parts, services, discounts, taxes, and balance.
- Confirm pickup, delivery, or shipping instructions.
Tax/VAT: when Totals says tax is off, choose Open Tax / VAT Settings. An owner/admin enables the shop profile, enters its jurisdiction and rate, selects taxable parts/services, and saves. Return to an older work order and apply the shop rate if prompted.
Discounts: choose Percentage (%) or Fixed amount first, then enter the amount. The total updates immediately; save the work order to retain it.
A job should be complete enough that another technician can understand what happened without asking around the shop.
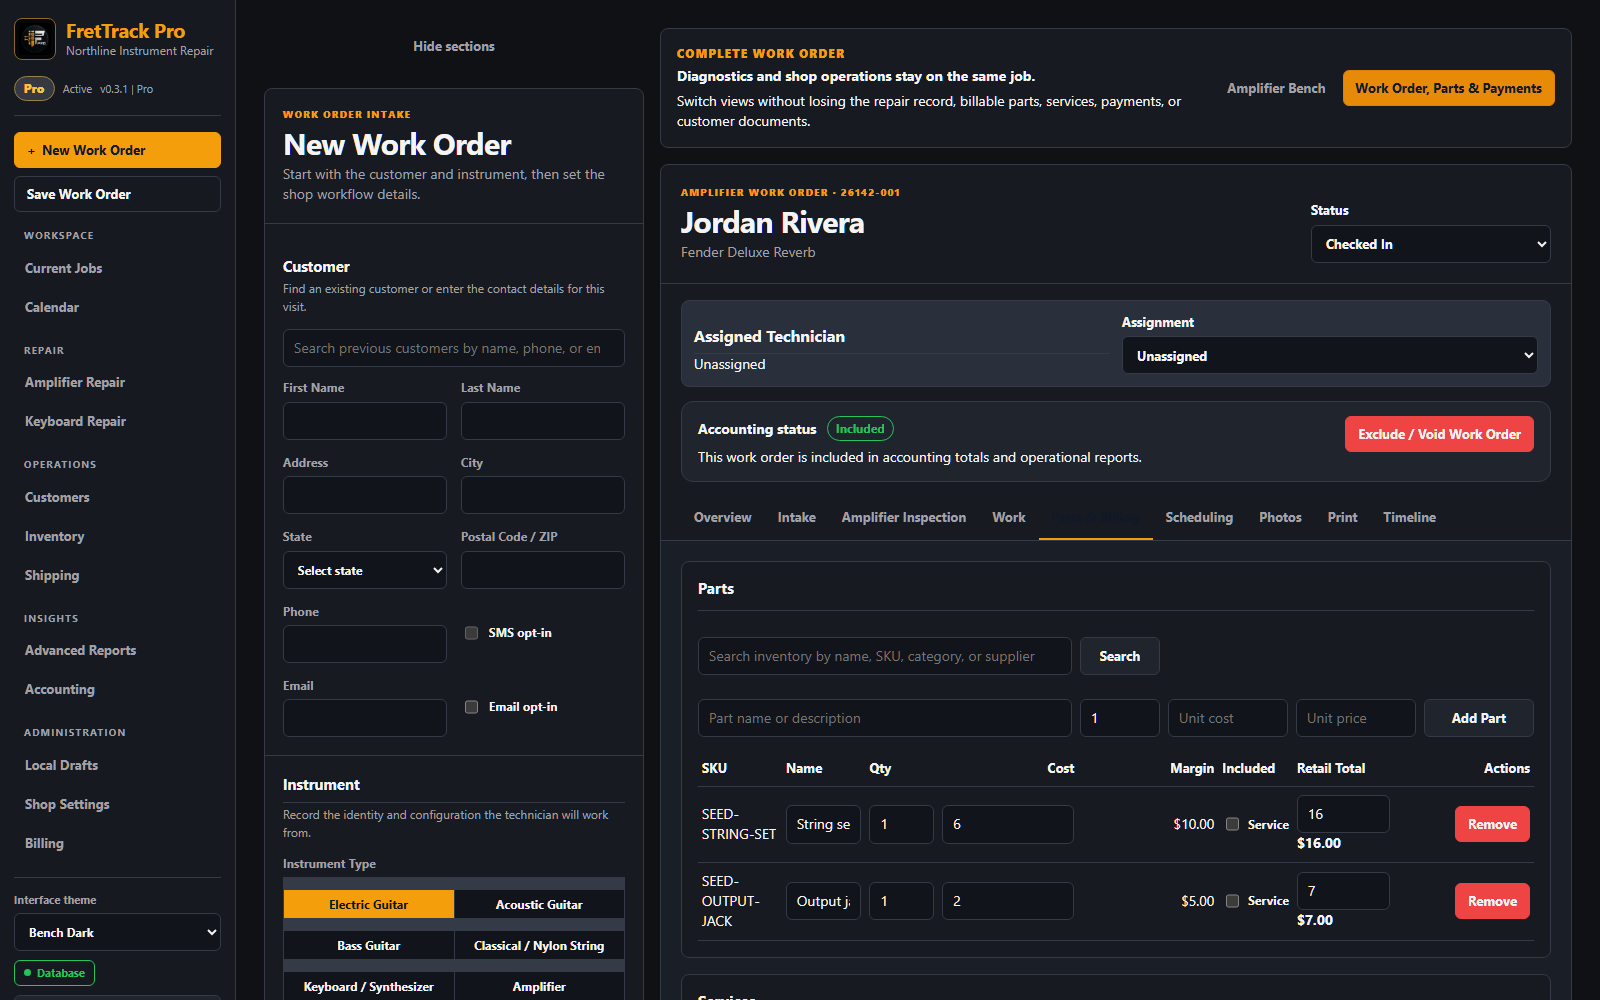
Screenshot shows fictional shop and customer data.
Estimates
An estimate is a simple document showing proposed work and expected cost. It remains editable and does not require customer approval before work continues.
Send a real estimate
- Choose Estimate from Document Type when creating the record.
- Add the services, parts, discount, and tax that belong in the quote, then save.
- Choose Print Estimate or Email Estimate from the record actions.
Keep working normally
- Change services, parts, discounts, or tax whenever the scope changes.
- Print or email the current estimate again when needed.
- When the customer proceeds, switch Document Type to Work Order, then use Finalize Invoice when the final bill is ready.
The estimate email includes the greeting, proposed work, line items, tax, and estimated total. You can edit the message before sending.
Amplifier and keyboard repair
Pro shops can open dedicated repair benches for amplifiers and musical keyboards. These benches keep instrument-specific diagnostics separate from guitar setup fields while preserving one customer, work-order number, billing record, schedule, message history, and timeline.
Repair Bench
- Amplifier jobs record safety findings, diagnosis, electrical measurements, digital diagnostics, evidence, and final verification.
- Keyboard jobs record keybed profiles, per-key faults, power and MIDI findings, guided diagnostics, parts requests, and functional tests.
- Use the instrument-specific Inspection tab; guitar neck, string, setup-measurement, and Damage Map fields stay with stringed-instrument jobs.
Work Order, Parts & Payments
- Switch to the shared commercial view for parts, services, tax, discounts, payments, balances, invoice email, printing, photos, scheduling, messages, and history.
- Create a vendor purchase order from the specialist bench when a repair part must be ordered.
- Receive the vendor quantity in Inventory, then explicitly add only the quantity required by the job to Parts & Payments.
Work logs and job history
Work logs are the repair timeline. They should explain diagnosis, approval, repair progress, installed parts, customer communication, final setup, and handoff notes.
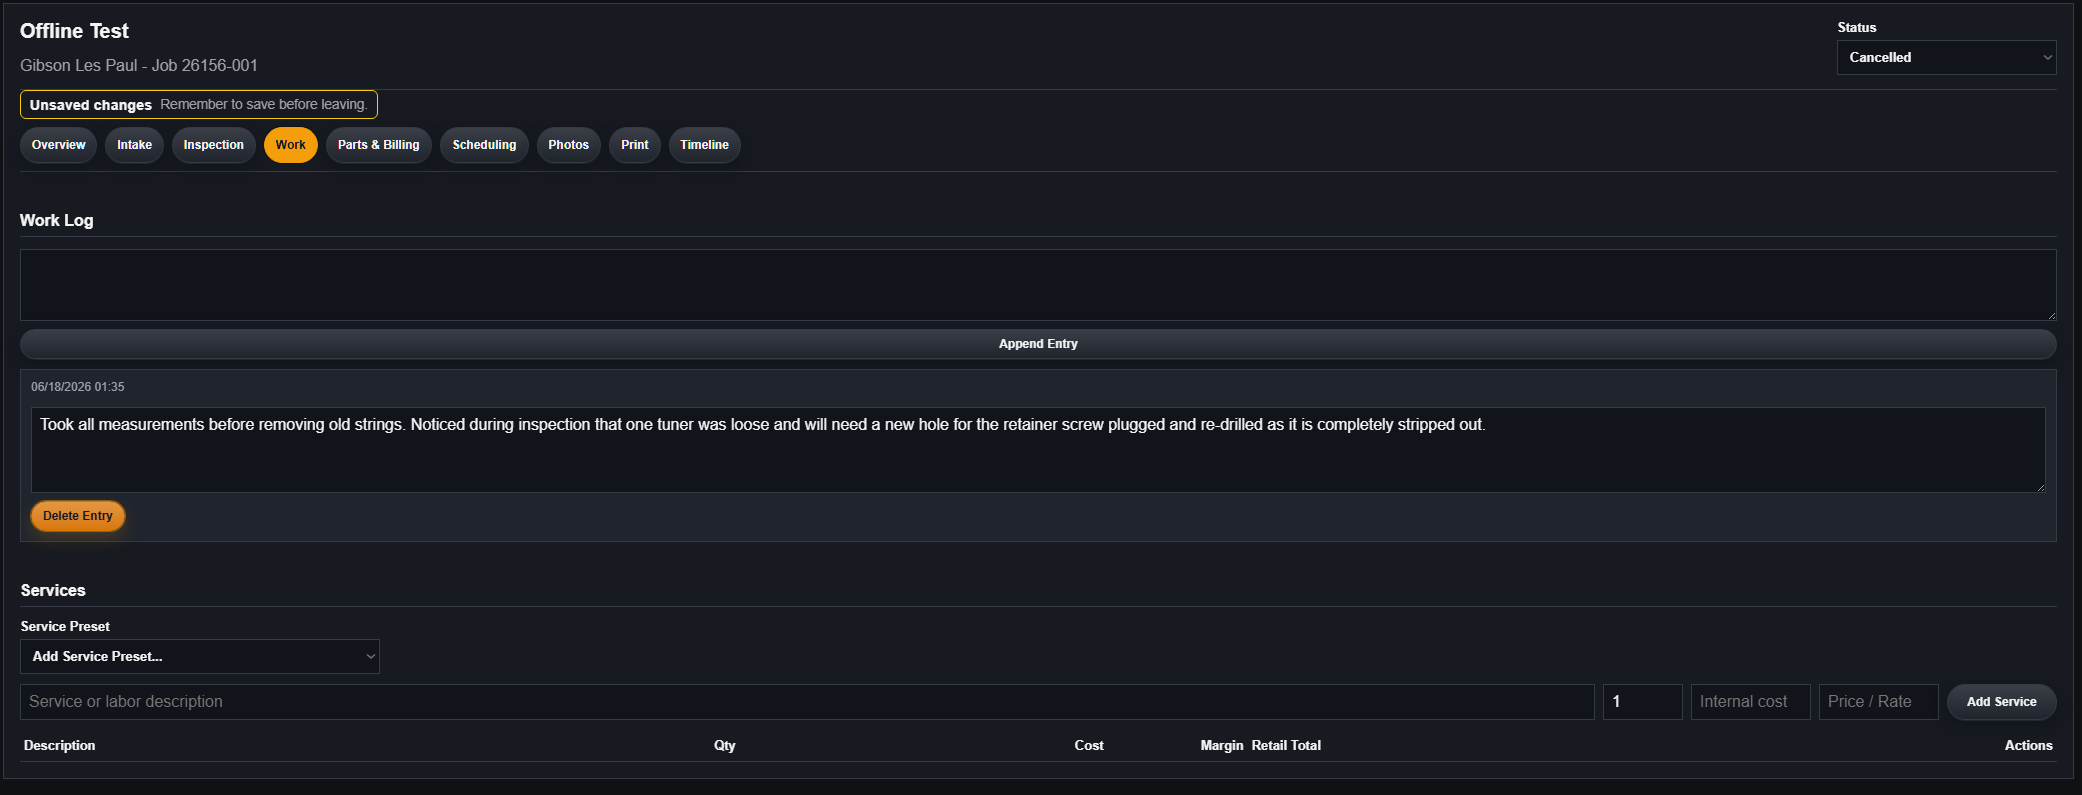
Useful work log entries
- Customer approved fret level by phone.
- Found loose output jack ground wire. Re-soldered and tested.
- Installed new 10-46 strings and set action to customer preference.
- Waiting on bridge saddles from vendor.
- Final check complete. No buzz through normal playing range.
When to add a work log
Add a note whenever the job changes direction, a customer approves work, a part is used, a problem is discovered, a technician hands off the job, or the job is ready for pickup.
Photos and damage maps
Photos and damage maps document the condition of the instrument before, during, and after repair. This protects the shop, helps the customer understand the work, and makes future job history more useful.
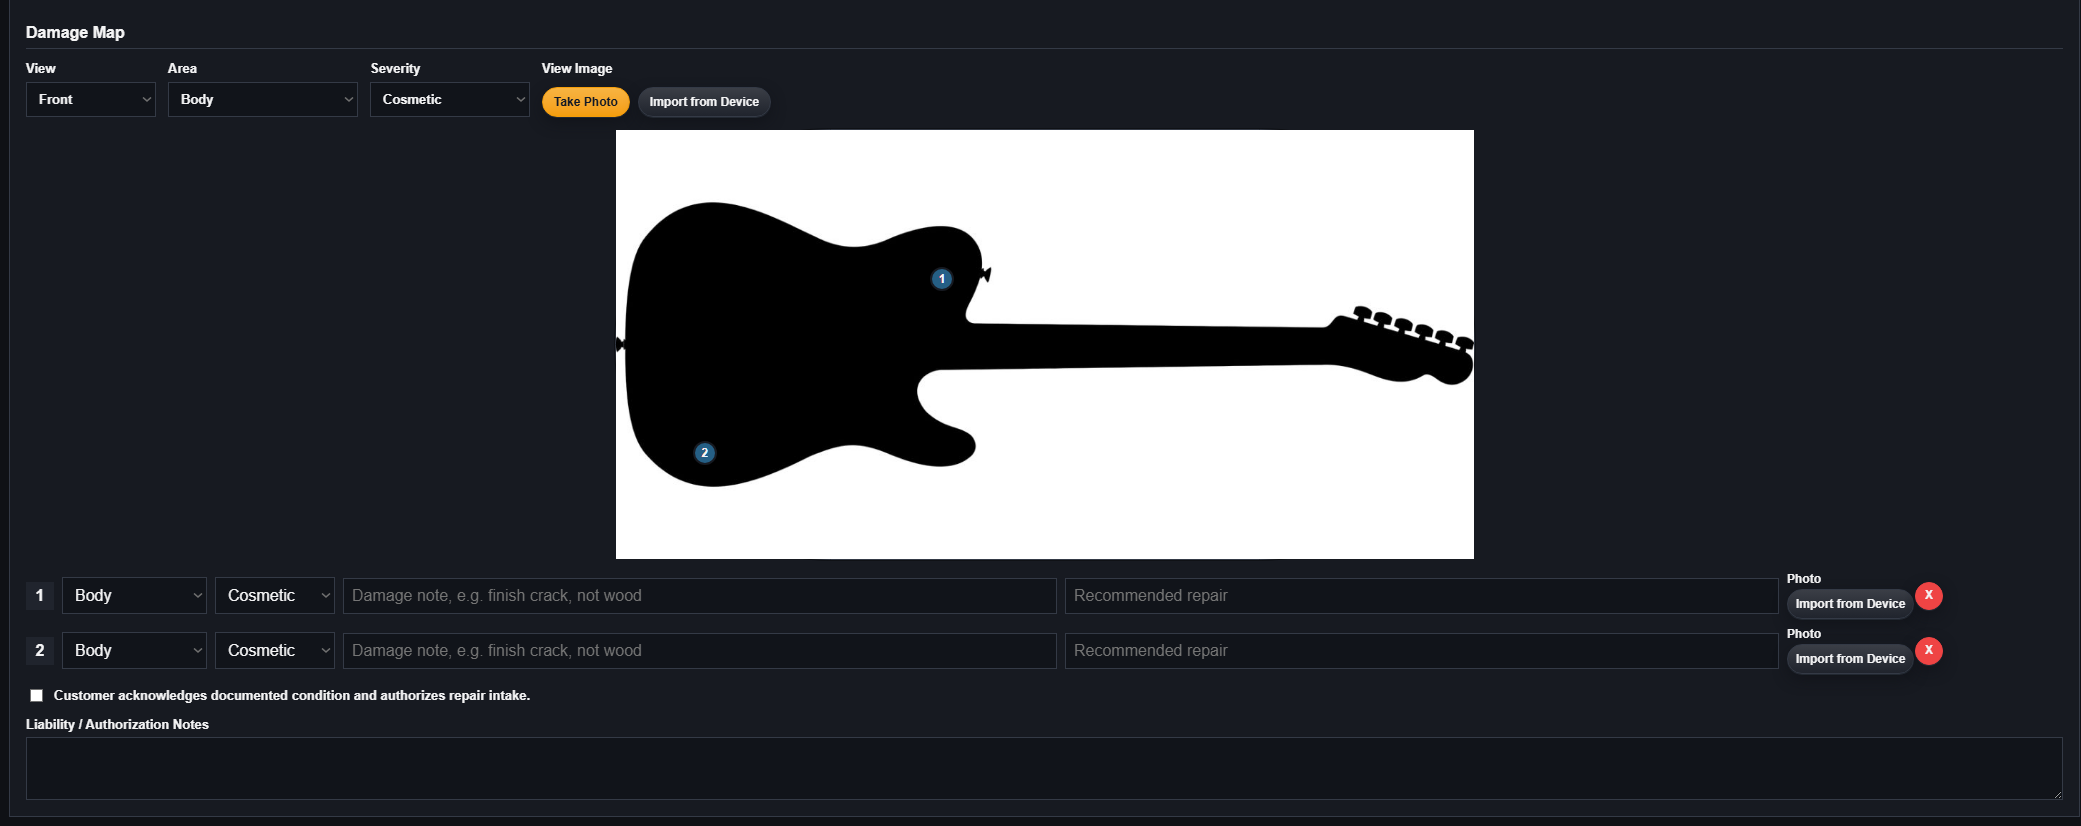
Recommended intake photos
- Front
- Back
- Headstock
- Serial number
- Existing damage
- Bridge, nut, frets, electronics, or case when relevant
Photo editor basics
- Use markup to point out condition or repair areas.
- Add captions when the image needs context.
- Crop or brighten dark shop photos when needed.
- Save as copy unless you intentionally want to replace the original.
Customer-facing reports should show useful condition and repair documentation. Shop-only notes should stay in the shop record.
Customers
Customer records keep contact information, communication preferences, and job history together. Always search before creating a new customer so the shop does not split a returning customer's history across duplicates.
Open a customer profile to sort and page through past jobs. Job numbers open the record; total, paid, and balance amounts open its billing; received dates filter All Jobs to that day. Select the account Balance Due card to reach unpaid work quickly. Payment history links to the source job.
For one Venmo or other verified payment covering multiple jobs, record the full transaction once on a source job. The profile displays any excess as customer credit. An owner/admin may apply only that excess to another job directly linked to the same customer, with a reason. To fix a mistake, reverse the credit allocation first, then void the mistaken payment entry with a reason. Both corrections are recorded rather than erased. An in-app void does not send money back through Venmo, a bank, or a card processor.
Create or update a customer
- Open Customers or use the customer area during New Job intake.
- Search by name, email, or phone.
- If no matching record exists, create a new customer.
- Add first name, last name, phone, email, address, notes, and contact preferences.
- Save the record and use it on the job.
Customer record habits
- Keep contact details current.
- Use notes for shop-relevant context.
- Respect SMS and email preferences. SMS consent can be recorded, but FretTrack texting is not enabled yet.
- Check job history before quoting or recommending work.
- Merge or clean up duplicates through the safest available shop workflow.
Customer communication and loyalty
Transactional email, incoming email replies, scheduled job email, automated service reminders, and loyalty serve different purposes. Record consent honestly and do not use one permission as a substitute for another. FretTrack does not currently send or receive SMS.
Email replies, scheduled email, and service reminders
- Open Messages from the left navigation and refresh the shop-wide Unassigned Inbox to review incoming email replies.
- Select one of the matched customer's work orders and use Route message. FretTrack does not guess from the subject line.
- The customer's Conversation panel shows only that customer's correspondence; the shop-wide inbox remains separate.
- Pro Scheduled Email sends an already-composed job message between two minutes and 30 days ahead and can be canceled before provider delivery.
- Automated Service Reminders use a separate customer opt-in and a shop rule based on a completed recurring service, such as a setup.
- Owners or admins configure the reminder interval, matching service words, subject, message, and optional booking link in Shop Settings.
- Use the customer-style preview to check the final tone and spacing. Open Edit subject and message only when customizing the copy, then use the labeled personalization buttons instead of typing field codes from memory.
- Reminder rules begin disabled. Enabling the shop rule does not opt customers in; each customer must still consent.
- Use Reminder Operations to check sending state, opt-in coverage, scheduled work, retries, delivery history, and staff-skipped reminders. Email addresses are not shown in this monitoring panel.
- Owners and admins can Recheck Eligibility, skip one pending or failed reminder with a required reason, and Restore Eligibility later. A skip is retained through automatic queue rebuilds; restoring still reruns every normal consent and eligibility check.
- Recent consent history records opt-ins and opt-outs. Staff can withdraw consent on the customer profile; every delivered automated reminder also gives the customer a secure confirmation link that turns off reminders and cancels unsent reminders immediately.
- Opening the customer link does not opt the customer out until they choose Stop Automated Reminders. The page exposes no customer, shop, instrument, or work-order details, and submitting the same link again is harmless.
- Use the dedicated Automated Service Reminders instructions when setting up the rule or troubleshooting a queue that is empty, canceled, or retrying.
Loyalty
- Pro Loyalty awards stamps only for qualifying linked work orders that are completed, positive-total, and fully paid after the program starts.
- Customer profiles show current progress and redemption history.
- Staff explicitly record a redemption, then deliberately add the promised service or discount to the work order.
- Loyalty does not automatically take payment, create store credit, or alter an invoice.
- For a customer-facing printed reminder, owners and admins can add a short note in Shop Settings → Print Footer Text, such as: “Ask us about our Loyalty Program. Eligible completed and fully paid repairs earn stamps toward the reward described by our shop.” Only use wording that matches the shop’s configured reward and terms.
Inventory and parts
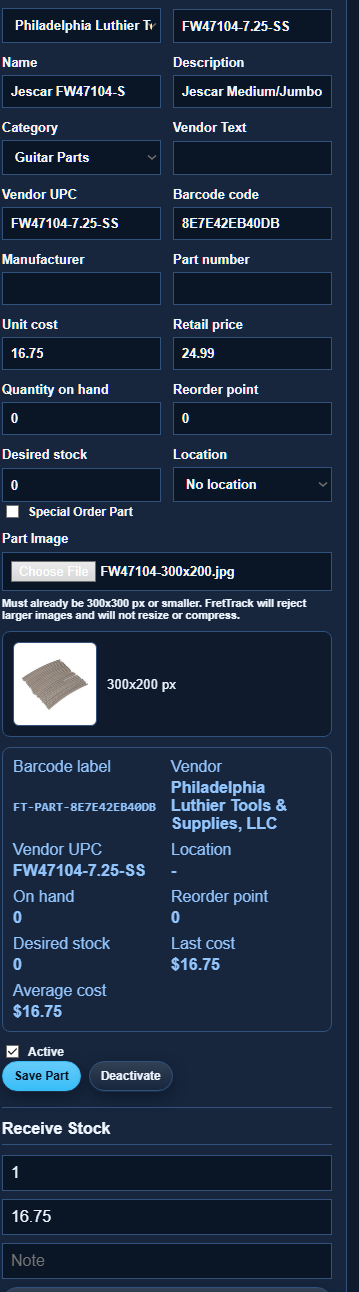
Inventory tracks the parts a shop wants to manage across jobs, stock counts, vendors, purchase orders, receiving, barcode labels, and purchase history.
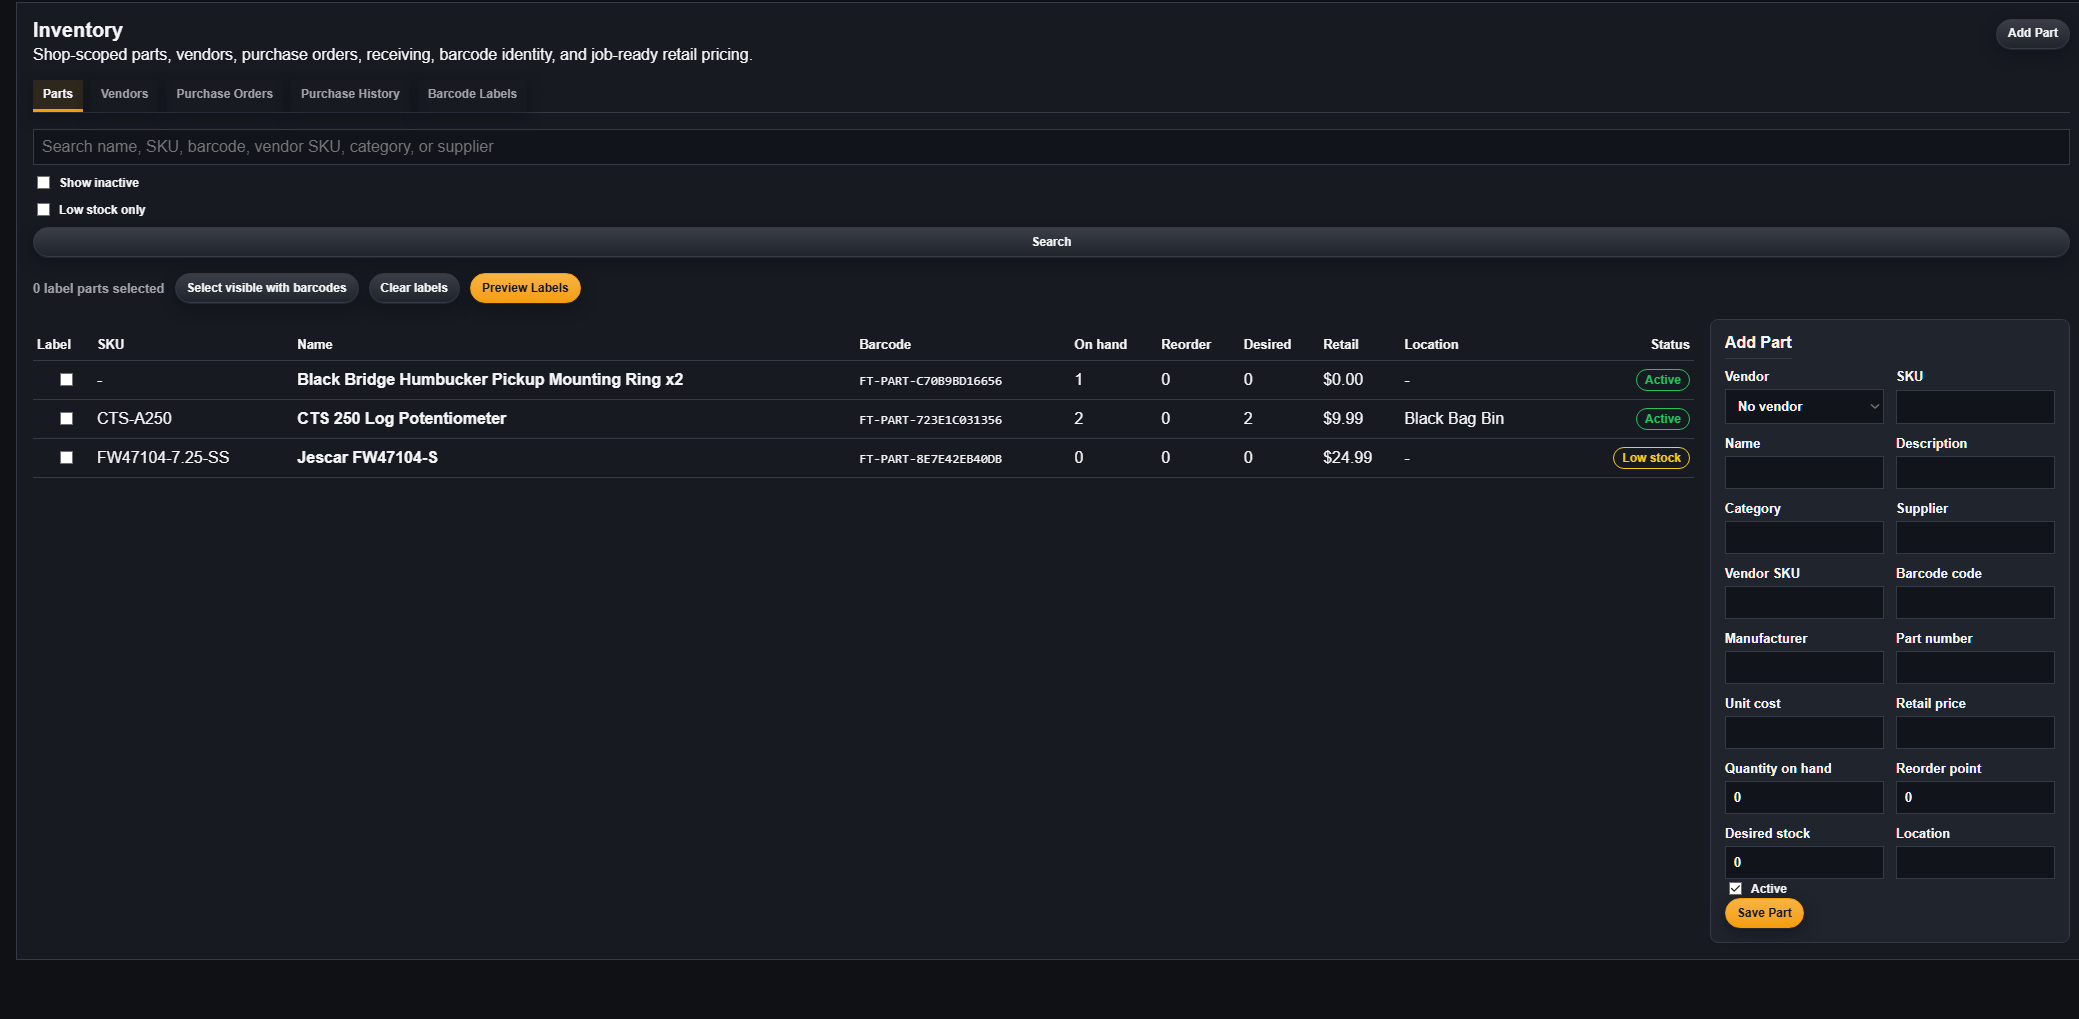
Part fields
A part can include Vendor, Part Name, Part Number, Category, Location, Description, Vendor SKU, Vendor UPC, Barcode, Manufacturer, Manufacturer UPC, Vendor Sells As, Items per Package, Vendor Cost, Retail Price, QTY On Hand, Reorder Point, Desired Stock, Special Order status, and Part Image. Normal stock adjustments and job usage continue to use individual inventory items.
Using parts on jobs
- Add the part from inventory when the item should affect stock.
- Enter the quantity used.
- Save the job or part change.
- FretTrack records the job part and stock movement.
- If the quantity is reduced or the part is removed, stock should be returned through the tracked workflow.
Vendors
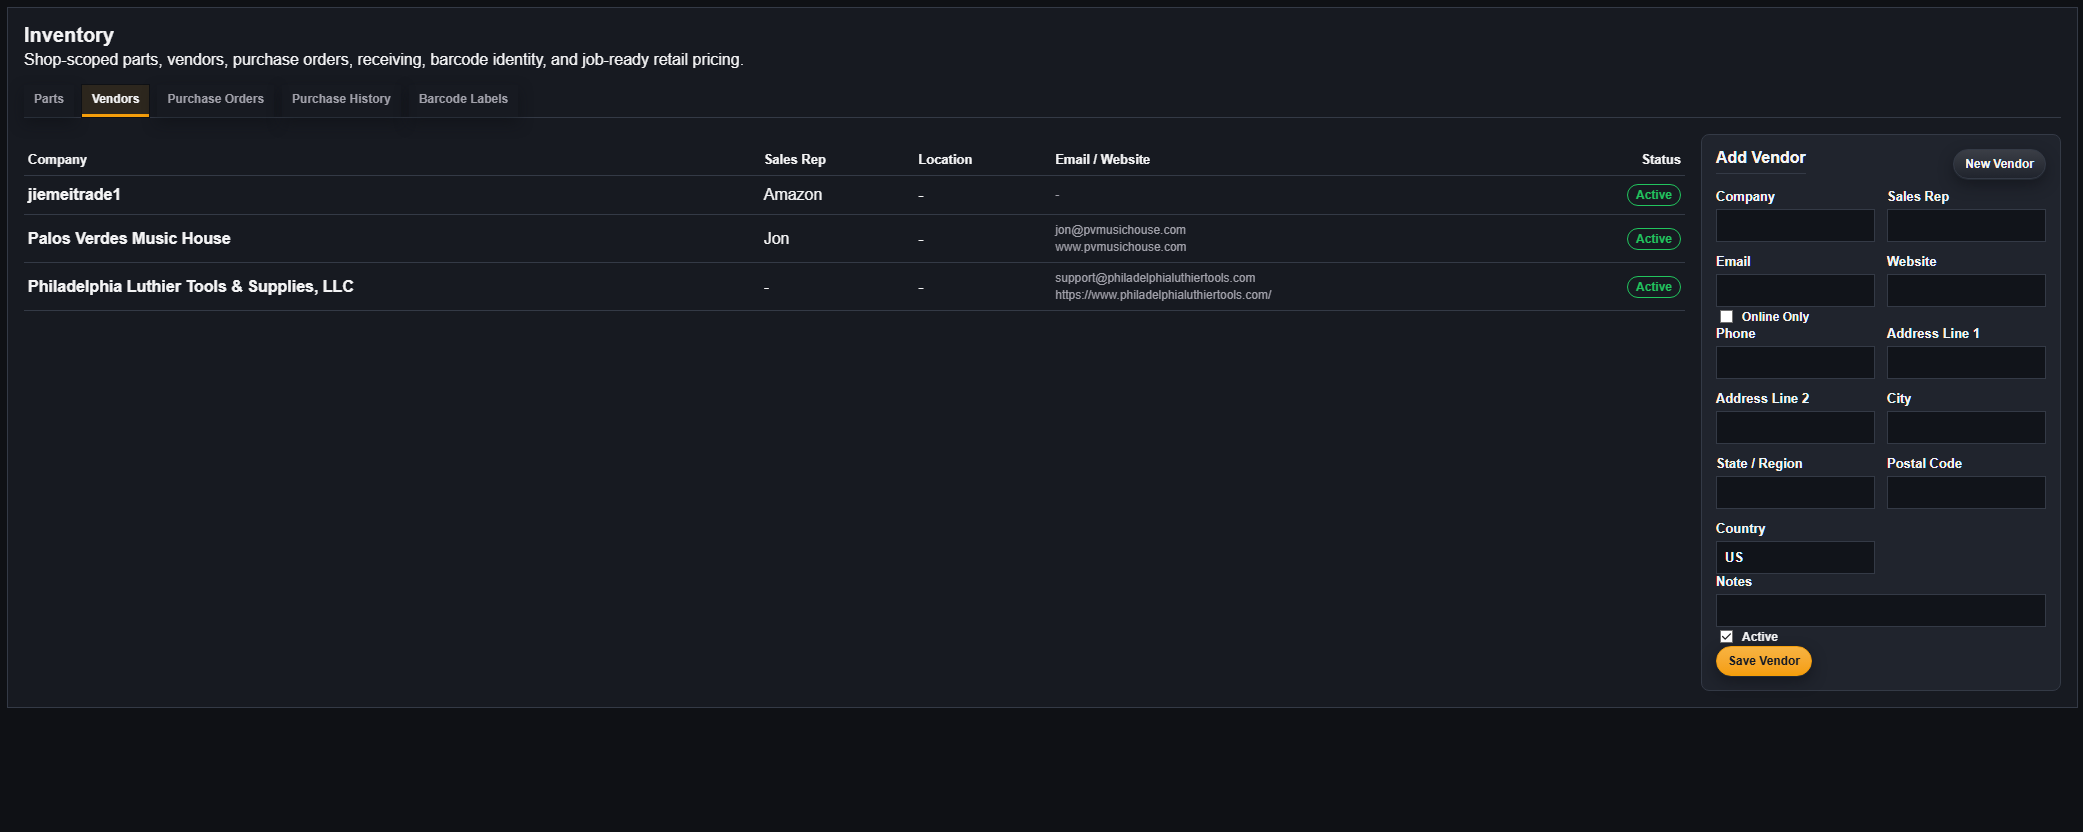
Vendors store the supplier details used for purchase orders, receiving, cost history, inventory organization, and optional lead-time estimates.
When to create a vendor
- The shop orders parts from the supplier repeatedly.
- The supplier appears on purchase orders.
- You want purchase history grouped by supplier.
- You need to track a sales rep, vendor website, or vendor notes.
Use Online Only for vendors where a physical address is not useful to the shop. That setting should not erase saved address fields unless a user clears them.
Import or export vendors
- Open Inventory → Vendors.
- Choose Export Vendors CSV for a complete directory download, or choose Import Vendors.
- Download the template, select your CSV, and choose Preview CSV.
- Review Ready, Warning, Duplicate, and Error rows.
- Choose Import Ready Vendors. Duplicate and invalid rows remain skipped.
Duplicate checks use Vendor ID, account number, email, phone, and vendor name. Imports never overwrite or merge a possible match automatically. Discount must be between 0 and 100, time zones use names such as America/Los_Angeles, and optional lead time is a whole number from 0–365 days.
Return parts to a vendor
- Open Inventory → Vendor Returns and create a draft for the vendor.
- Add each inventory part with the whole-number quantity being returned and its unit cost. Add PO, RMA, reason, expected credit, and notes when useful.
- Optionally mark the return Requested while waiting for authorization. This does not change inventory.
- When the parts leave the shop, enter tracking and choose Mark Shipped. This permanently removes the quantities from stock once.
- When credit arrives, record the amount and credit memo/reference.
Vendor credit tracking is separate from customer invoices, payments, and refunds. A shipped return cannot be cancelled because its inventory movement is retained for audit history.
Reorder Planner
The Reorder Planner is included in Shop and Pro. It suggests normal stocked parts only when current stock is at or below Reorder Point, then accounts for quantities still due on purchase orders marked Ordered or Partially Received. Draft and Cancelled POs do not count as incoming stock.
- Set Reorder Point and a higher Desired Stock value on the inventory part.
- Assign the part to a vendor and optionally set that vendor's typical Lead Time in days.
- Open Inventory → Reorder Planner and review the on-hand, incoming, and suggested values.
- Select the wanted parts under one vendor and choose Prepare draft PO.
- Review and edit the ordinary unsaved Draft in Purchase Orders before saving or marking it ordered.
Suggested quantities are rounded up to whole vendor purchase units. FretTrack does not contact the supplier, save the draft, or place an order automatically. Later predictive demand, seasonal, and usage-trend forecasting is planned for Pro and is not part of this planner.
Purchase orders
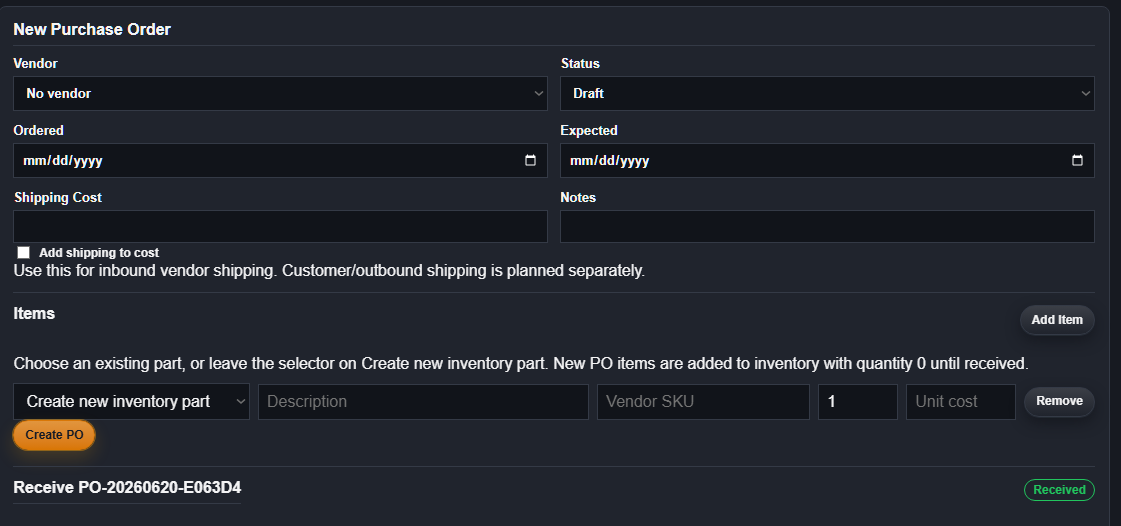
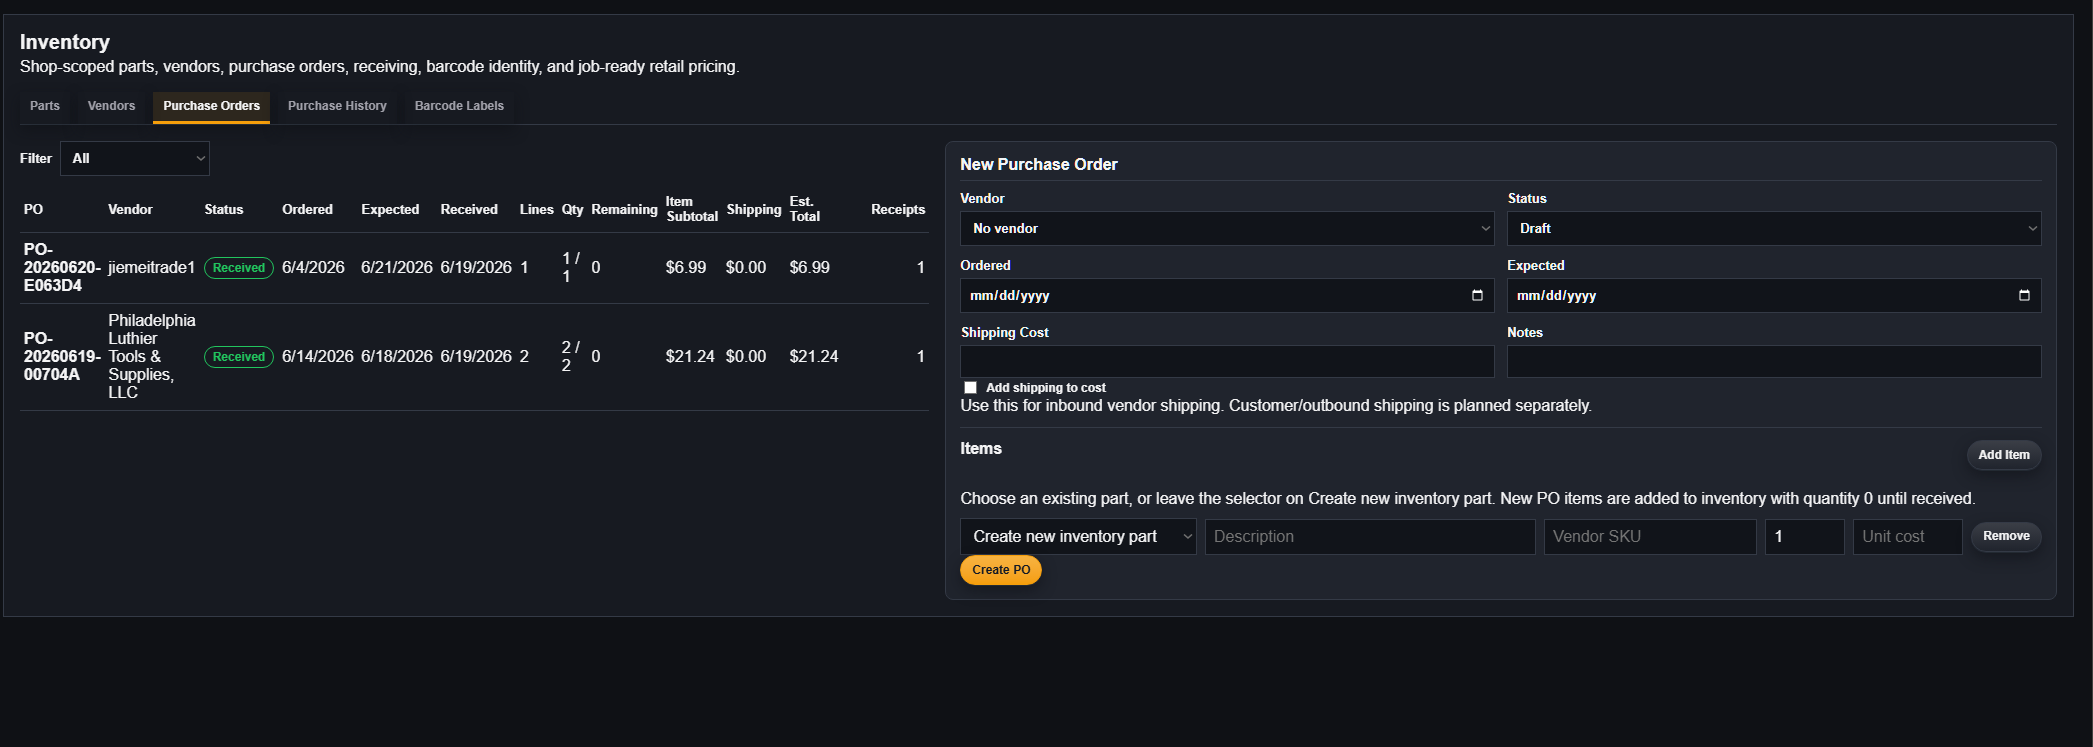
Purchase orders help the shop track parts that have been ordered but not necessarily received. They are useful for shop stock, special-order items, job-specific parts, vendor shipping, and purchase history.
Create a purchase order
- Open Inventory.
- Go to Purchase Orders.
- Create a new purchase order.
- Select the vendor.
- Add existing parts or create new part lines from the order.
- Enter the purchase-unit quantity ordered, unit cost, vendor SKU, and notes. Review the calculated individual inventory quantity for packs, boxes, bags, cases, sets, rolls, or bottles.
- Add shipping cost when the vendor charged inbound shipping.
- Choose whether shipping should be added into part cost.
- Save the purchase order.
Receiving and purchase history
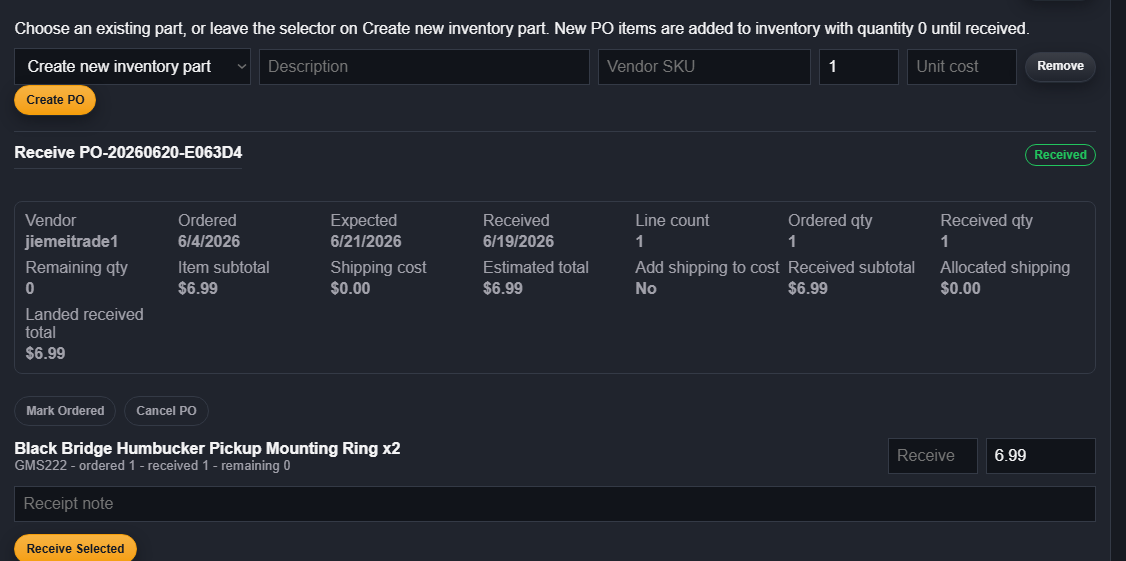
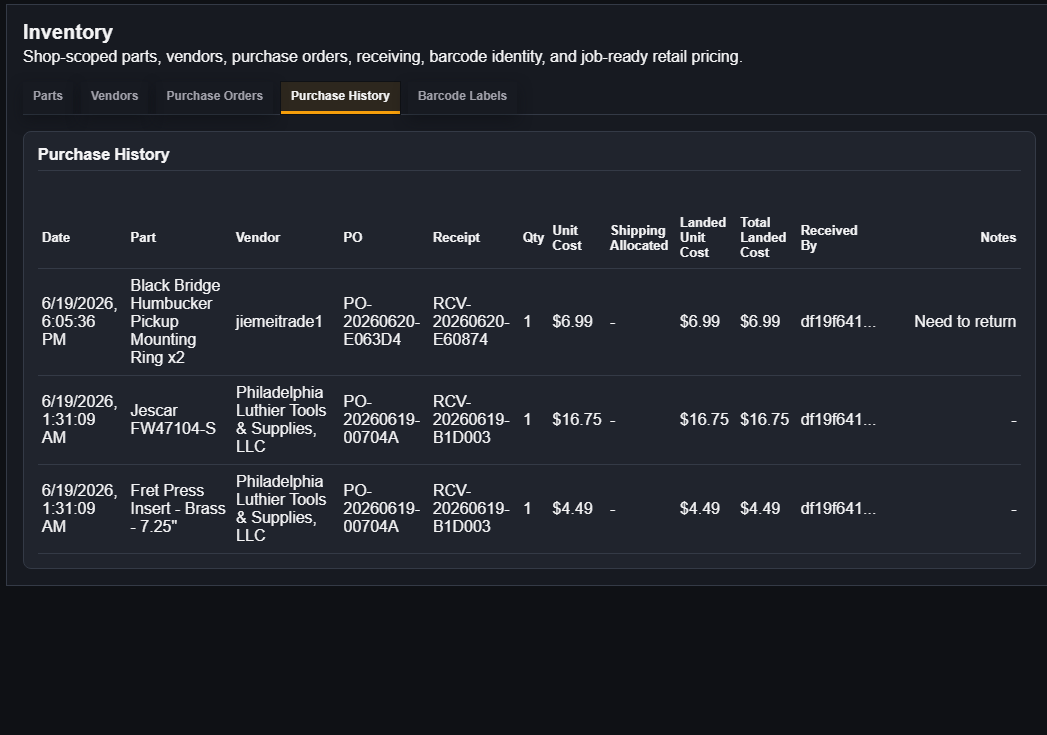
Receiving is the stock-changing step. Ordering a part does not mean the shop physically has it. Receiving records the item arrival, increases quantity on hand, updates cost history, and creates purchase history.
Partial receiving
If a vendor ships part of an order, receive only the purchase-unit quantity that arrived. FretTrack converts it into individual inventory units using the conversion saved on that PO line. The purchase order remains open for the remaining purchase units, and historical receipts keep their original conversion if the part setting changes later.
Shipping and landed cost
Inbound vendor shipping can be tracked on the purchase order. If Add shipping to cost is enabled, FretTrack can allocate that shipping into the received item cost so purchase history reflects landed cost.
Barcode labels
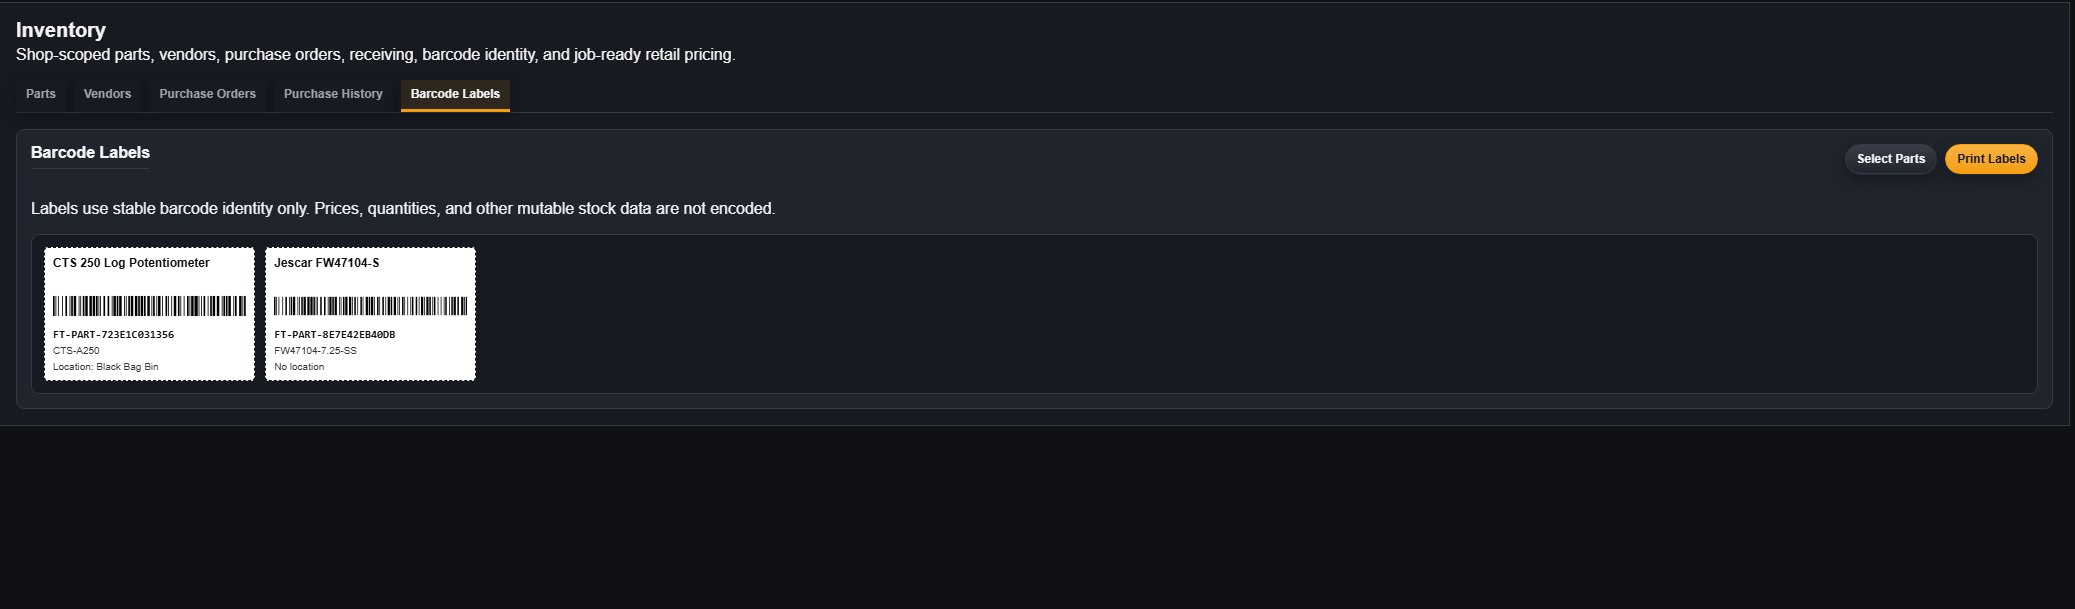
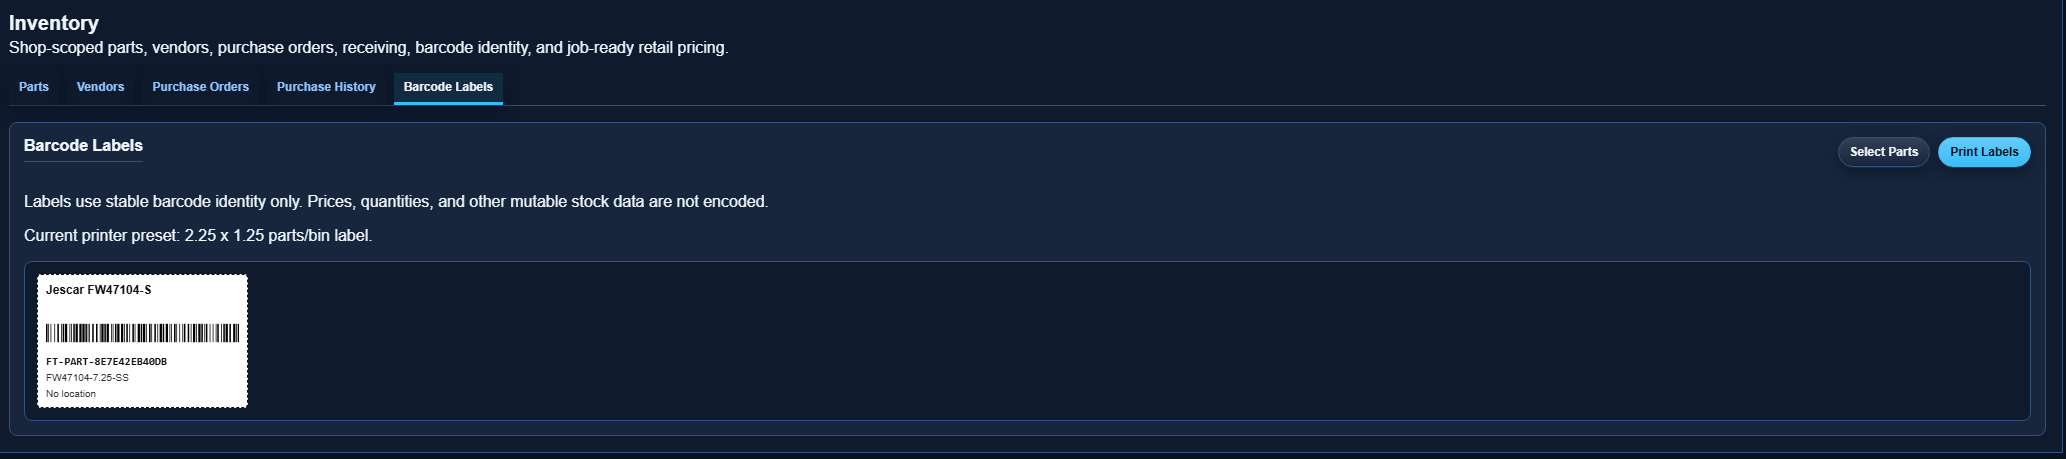
Barcode labels make inventory lookup faster and make parts easier to identify in bins, bags, drawers, and storage areas. FretTrack barcode identity uses the stable format FT-PART-{barcode_code}.
Barcode label habits
- Put labels on storage locations where possible, not only on tiny parts.
- Use the same location names in Shop Settings and inventory records.
- Search by the full FT-PART value or the raw barcode code.
- Do not encode changing details, such as quantity, into the barcode identity.
Shipping, receiving, and chain of custody
Shipping and custody records help the shop track packages, instruments, vendor items, customer returns, outbound shipments, and in-shop movement. This is manual tracking for shop workflow and does not replace a carrier account.
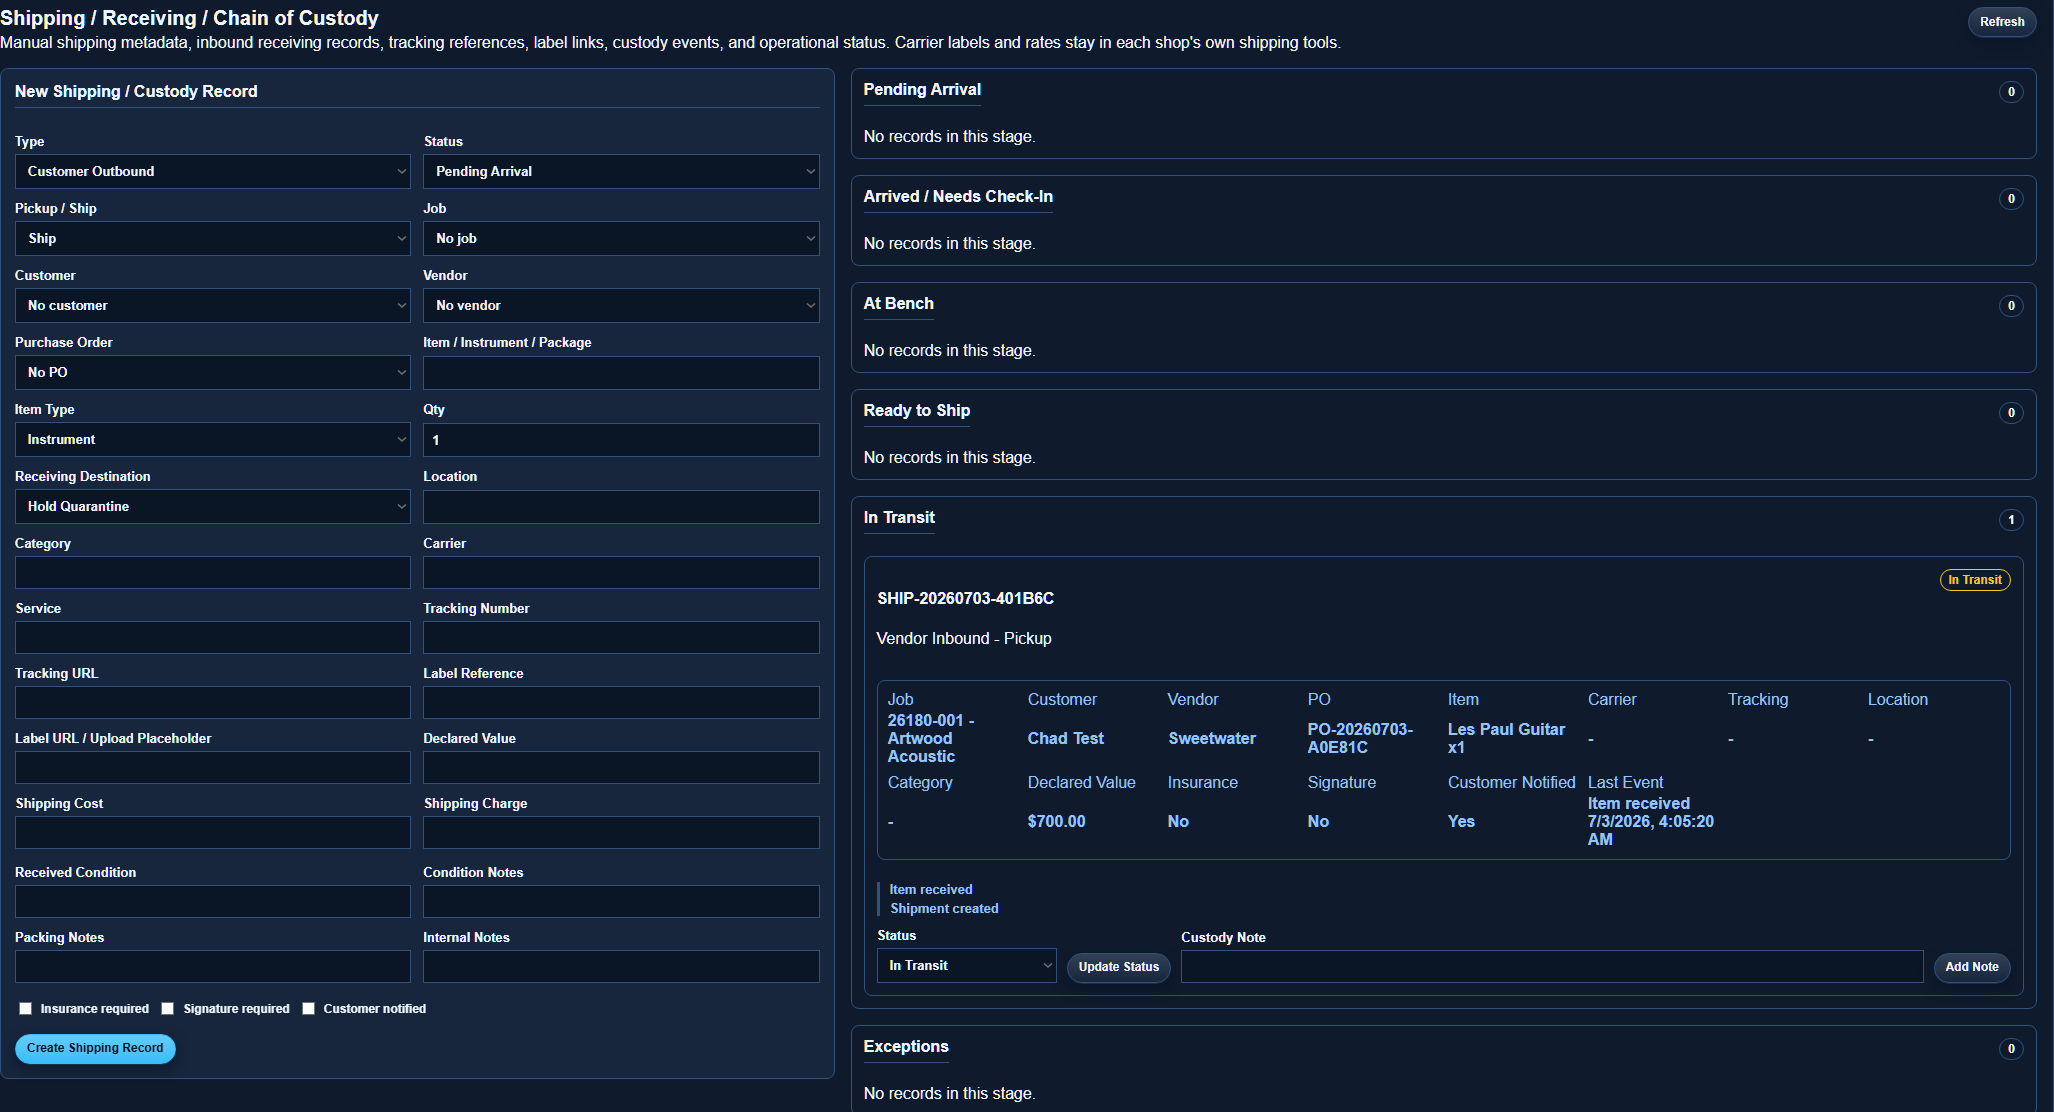
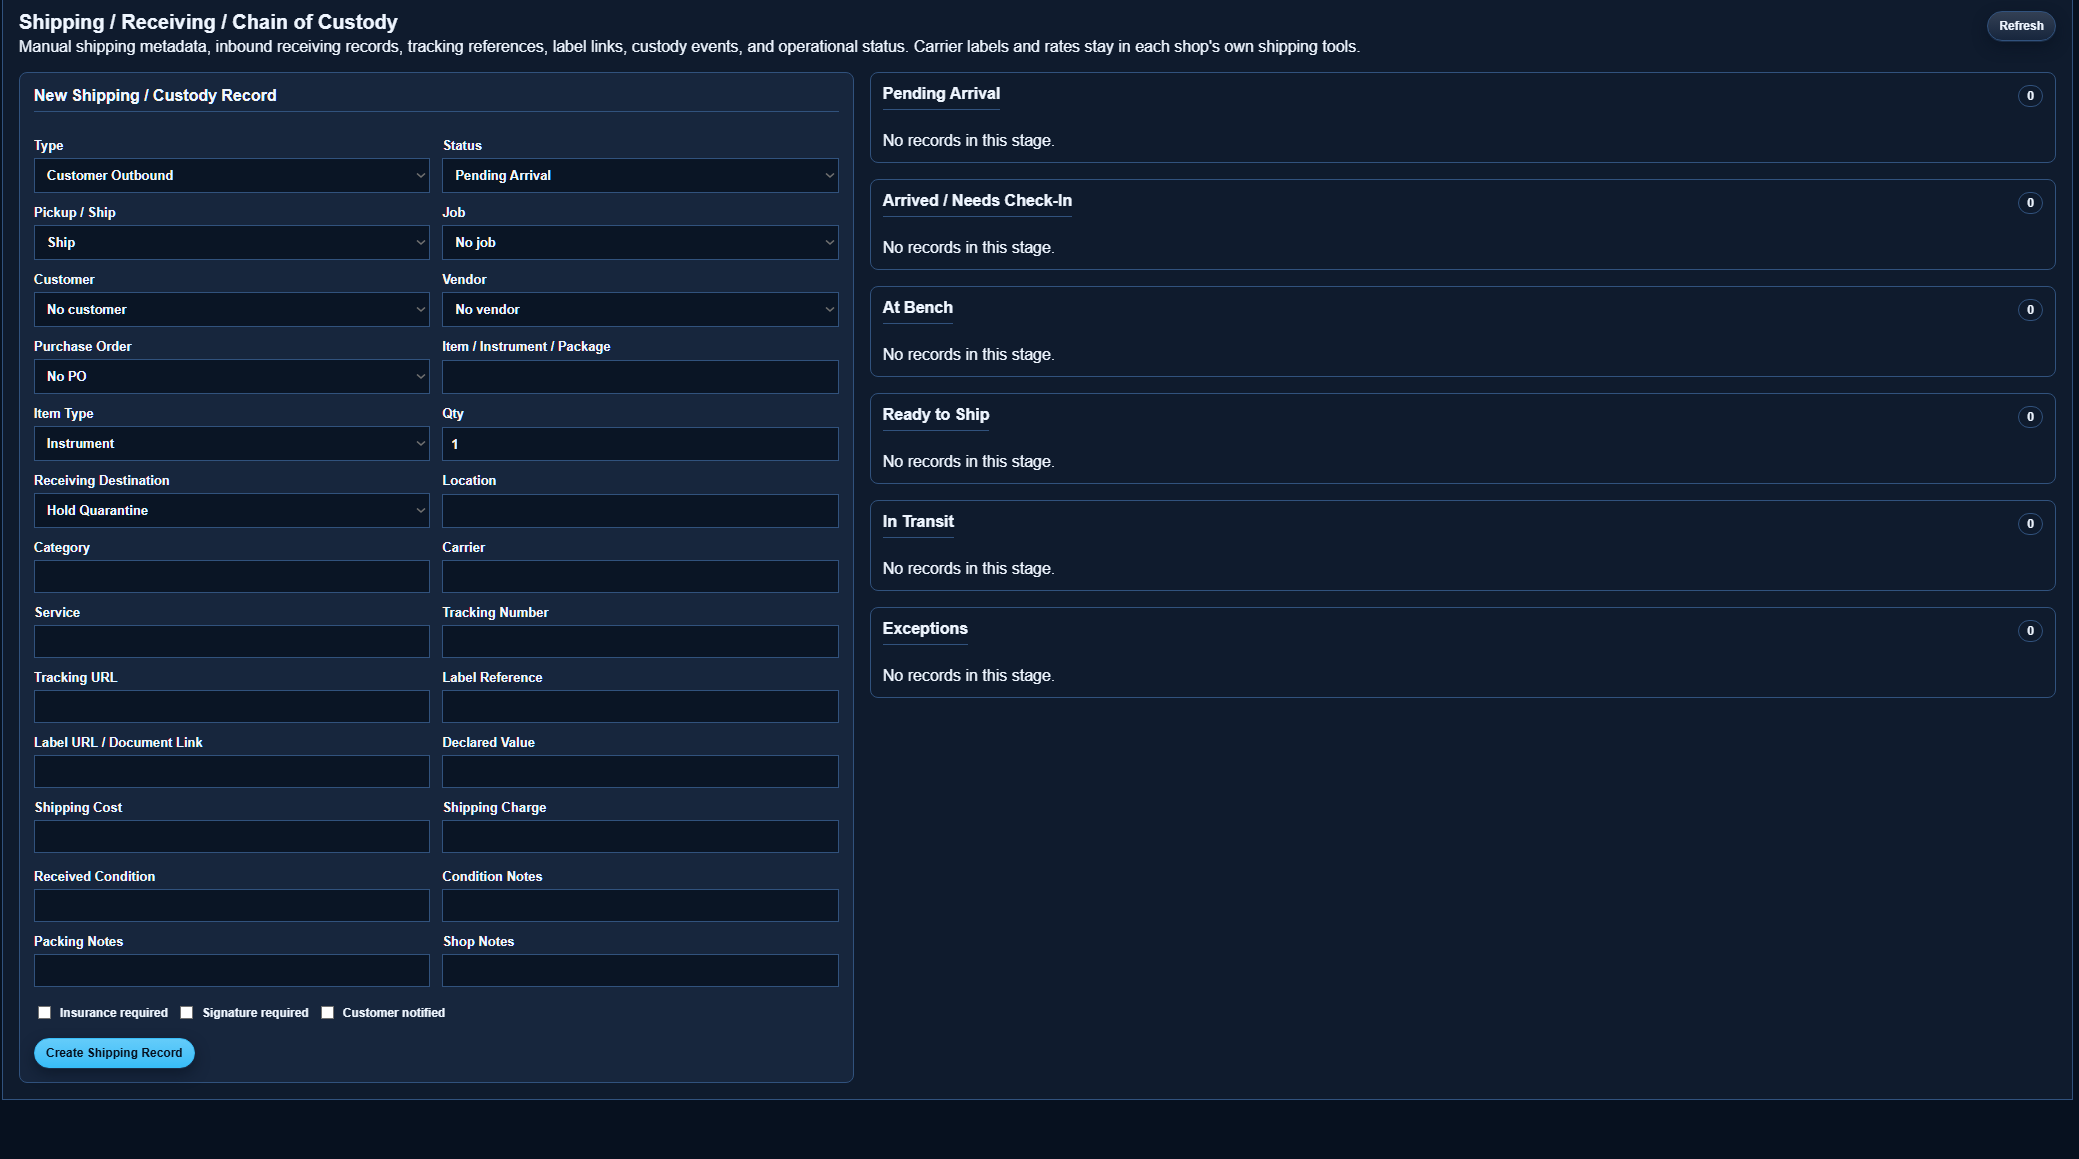
Useful shipping fields
- Direction and fulfillment method
- Status
- Carrier, service level, tracking number, and tracking URL
- Ship-to name and address snapshot
- Shipping cost and shipping charge
- Declared value, insurance, and signature requirement
- Condition notes, packing notes, and customer notification status
For purchase order receiving, use the inventory receiving workflow to change stock. Use shipping and custody records to document movement and package status.
Send a repaired instrument back
- Open the work order and choose the Shipping tab.
- Confirm the delivery method and ship-to address snapshot.
- Add the carrier, service, tracking number, shipping cost/customer charge, and packing requirements, then save.
- Print the Customer Ship-Back Summary if the packing counter needs a paper copy.
- Review or edit the prepared customer message and choose Email Tracking Update.
The Shipping dashboard totals ready, in-transit, delivered, and exception records and can export shipping cost, customer charge, tracking, and notification status to CSV. Carrier labels and postage are still purchased outside FretTrack.
Scheduling
Scheduling helps the shop plan intake, pickup, due dates, follow-ups, shop blocks, and other calendar events. Scheduling is especially useful when promise dates, customer pickups, or staff availability affect the repair plan.
Common event types
- Intake appointment
- Pickup appointment
- Due date
- Follow-up
- Shop block
- Other shop event
Scheduling tips
- Use promise dates for expected completion dates.
- Use schedule events for calendar actions.
- Attach events to jobs when they relate to a specific instrument.
- Use shop blocks to reserve bench time or unavailable time.
Reports
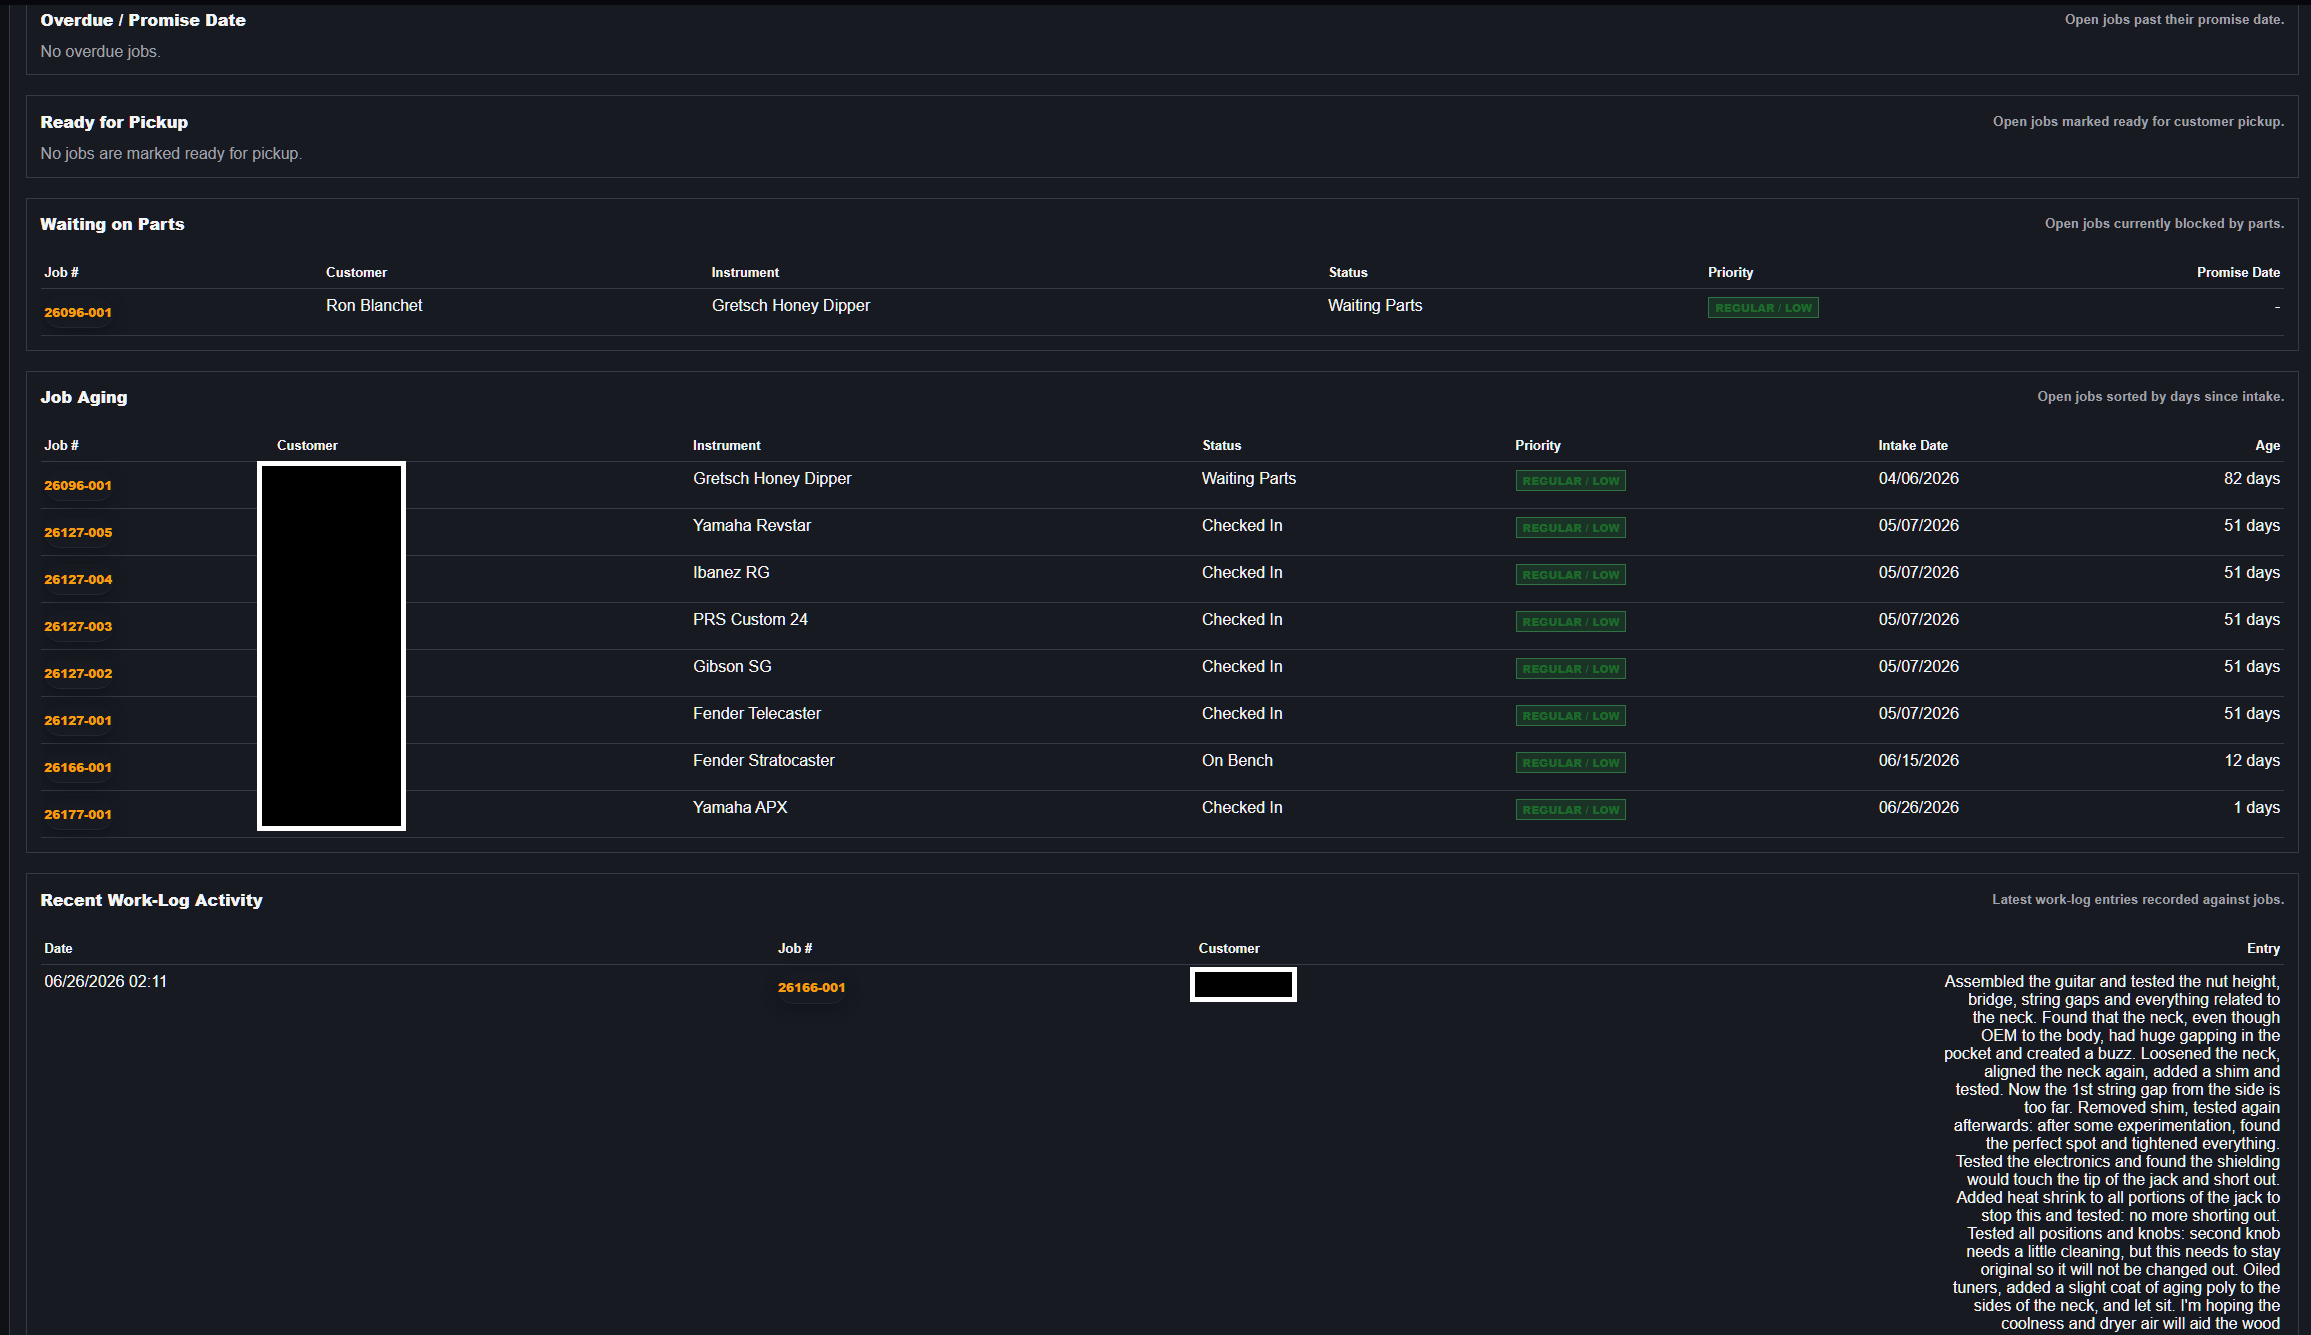
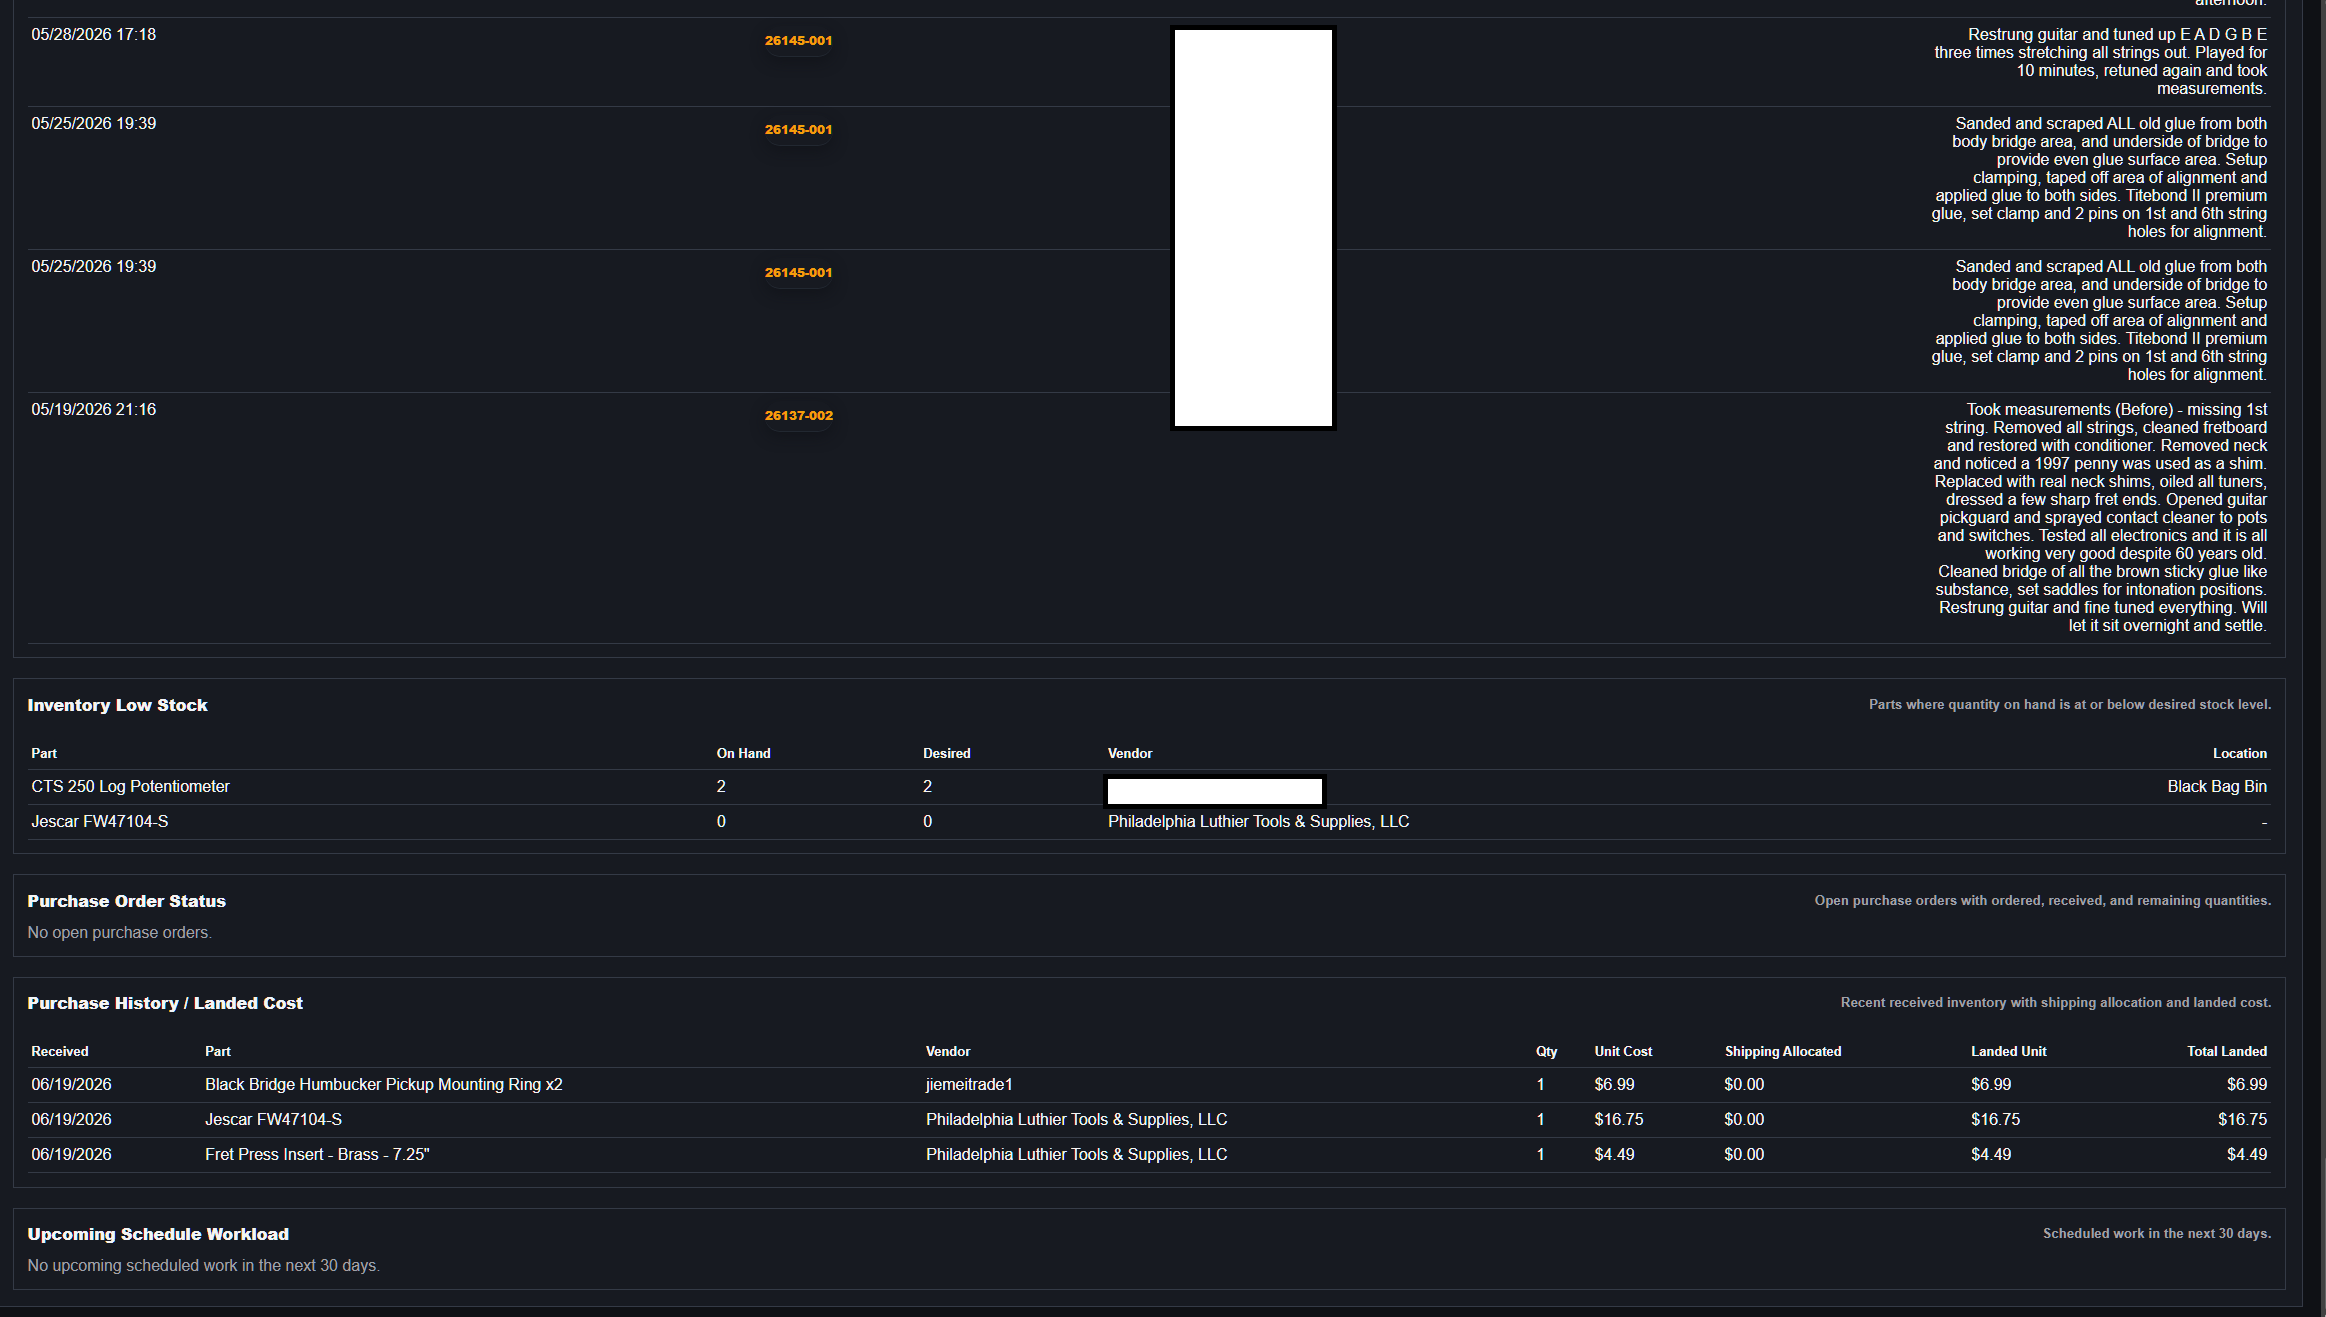
Reports help eligible shops review workload, job status, priority, overdue work, pickup readiness, parts issues, inventory, purchase orders, landed cost history, work-log activity, and upcoming schedule load.
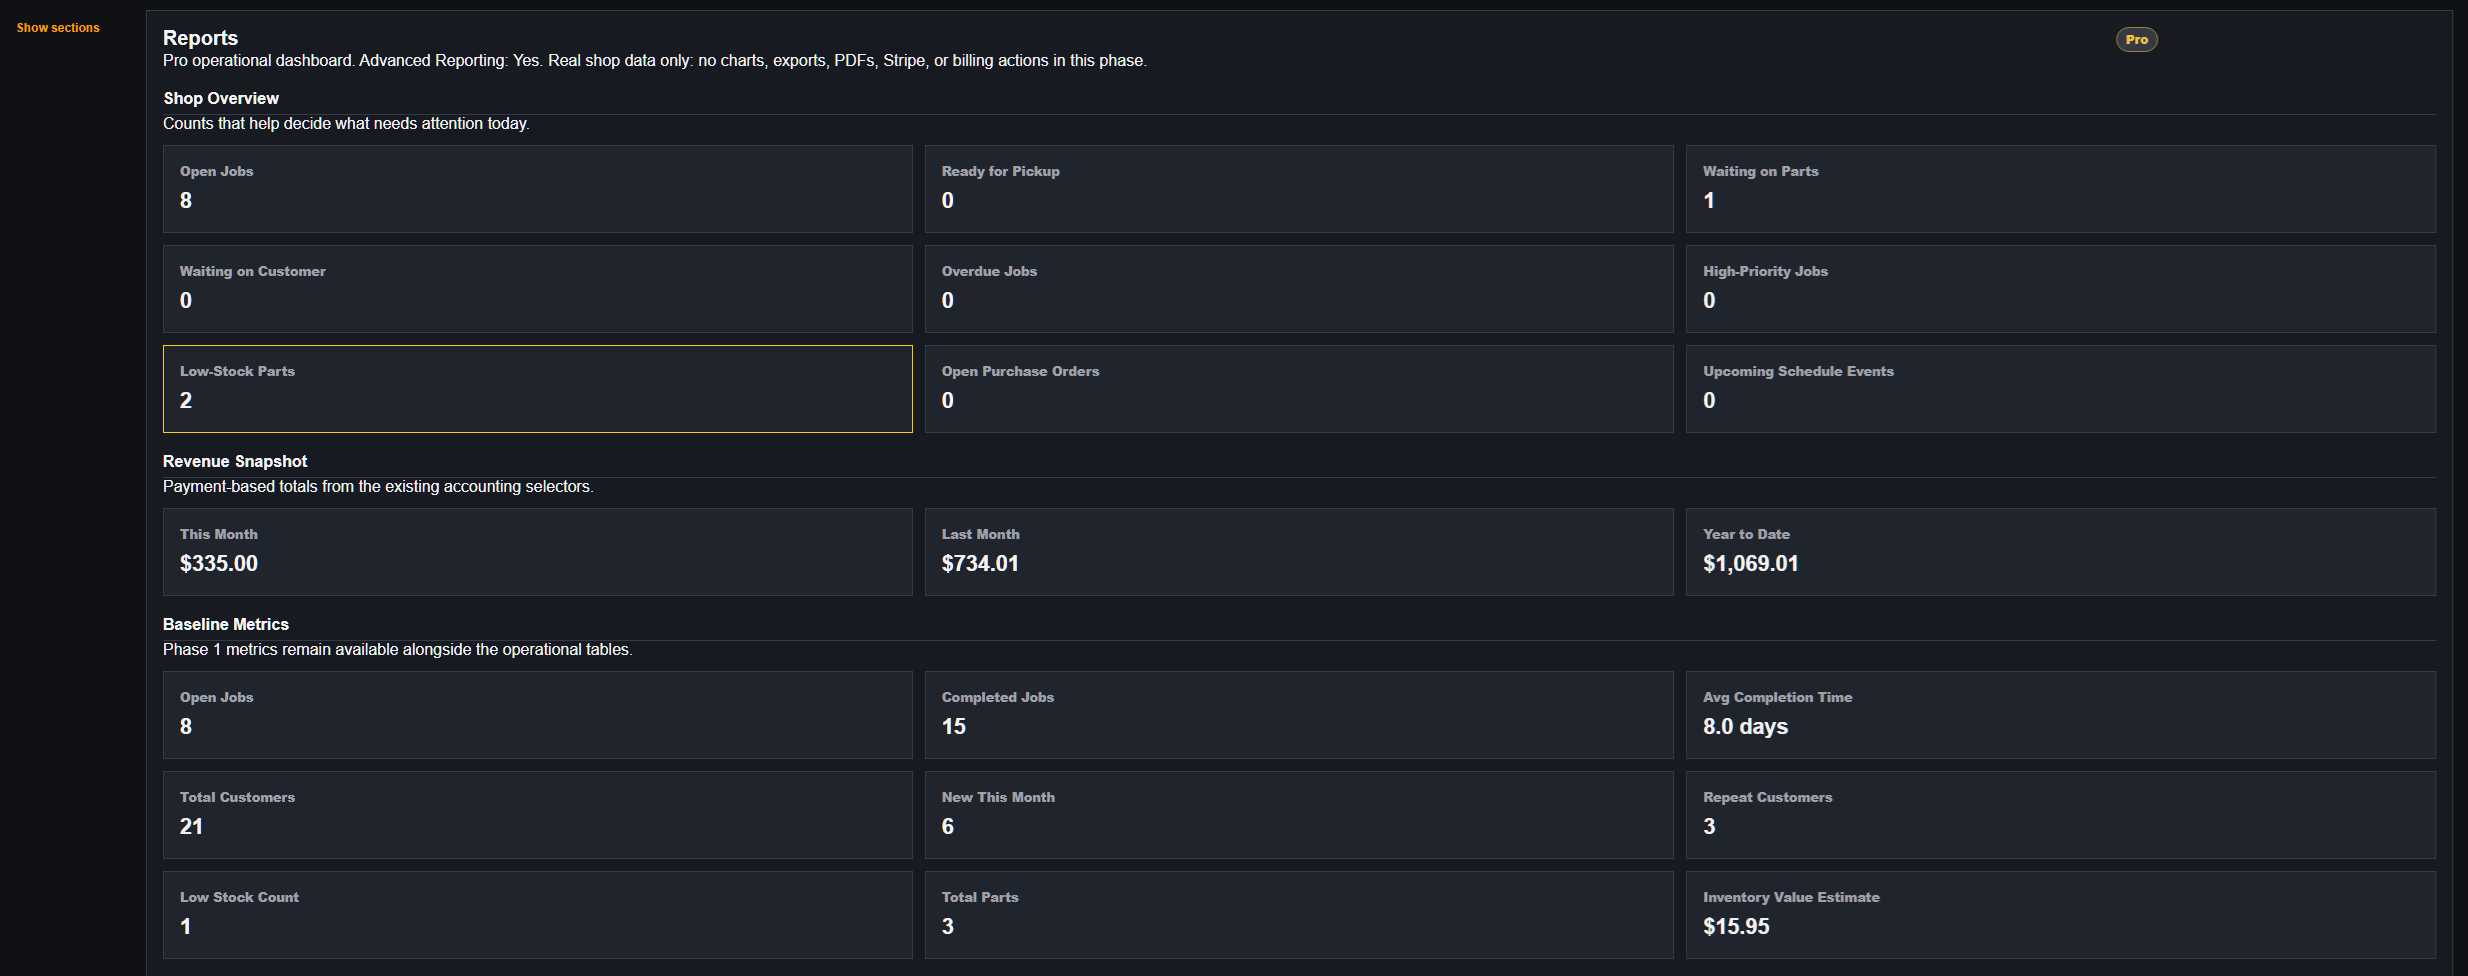
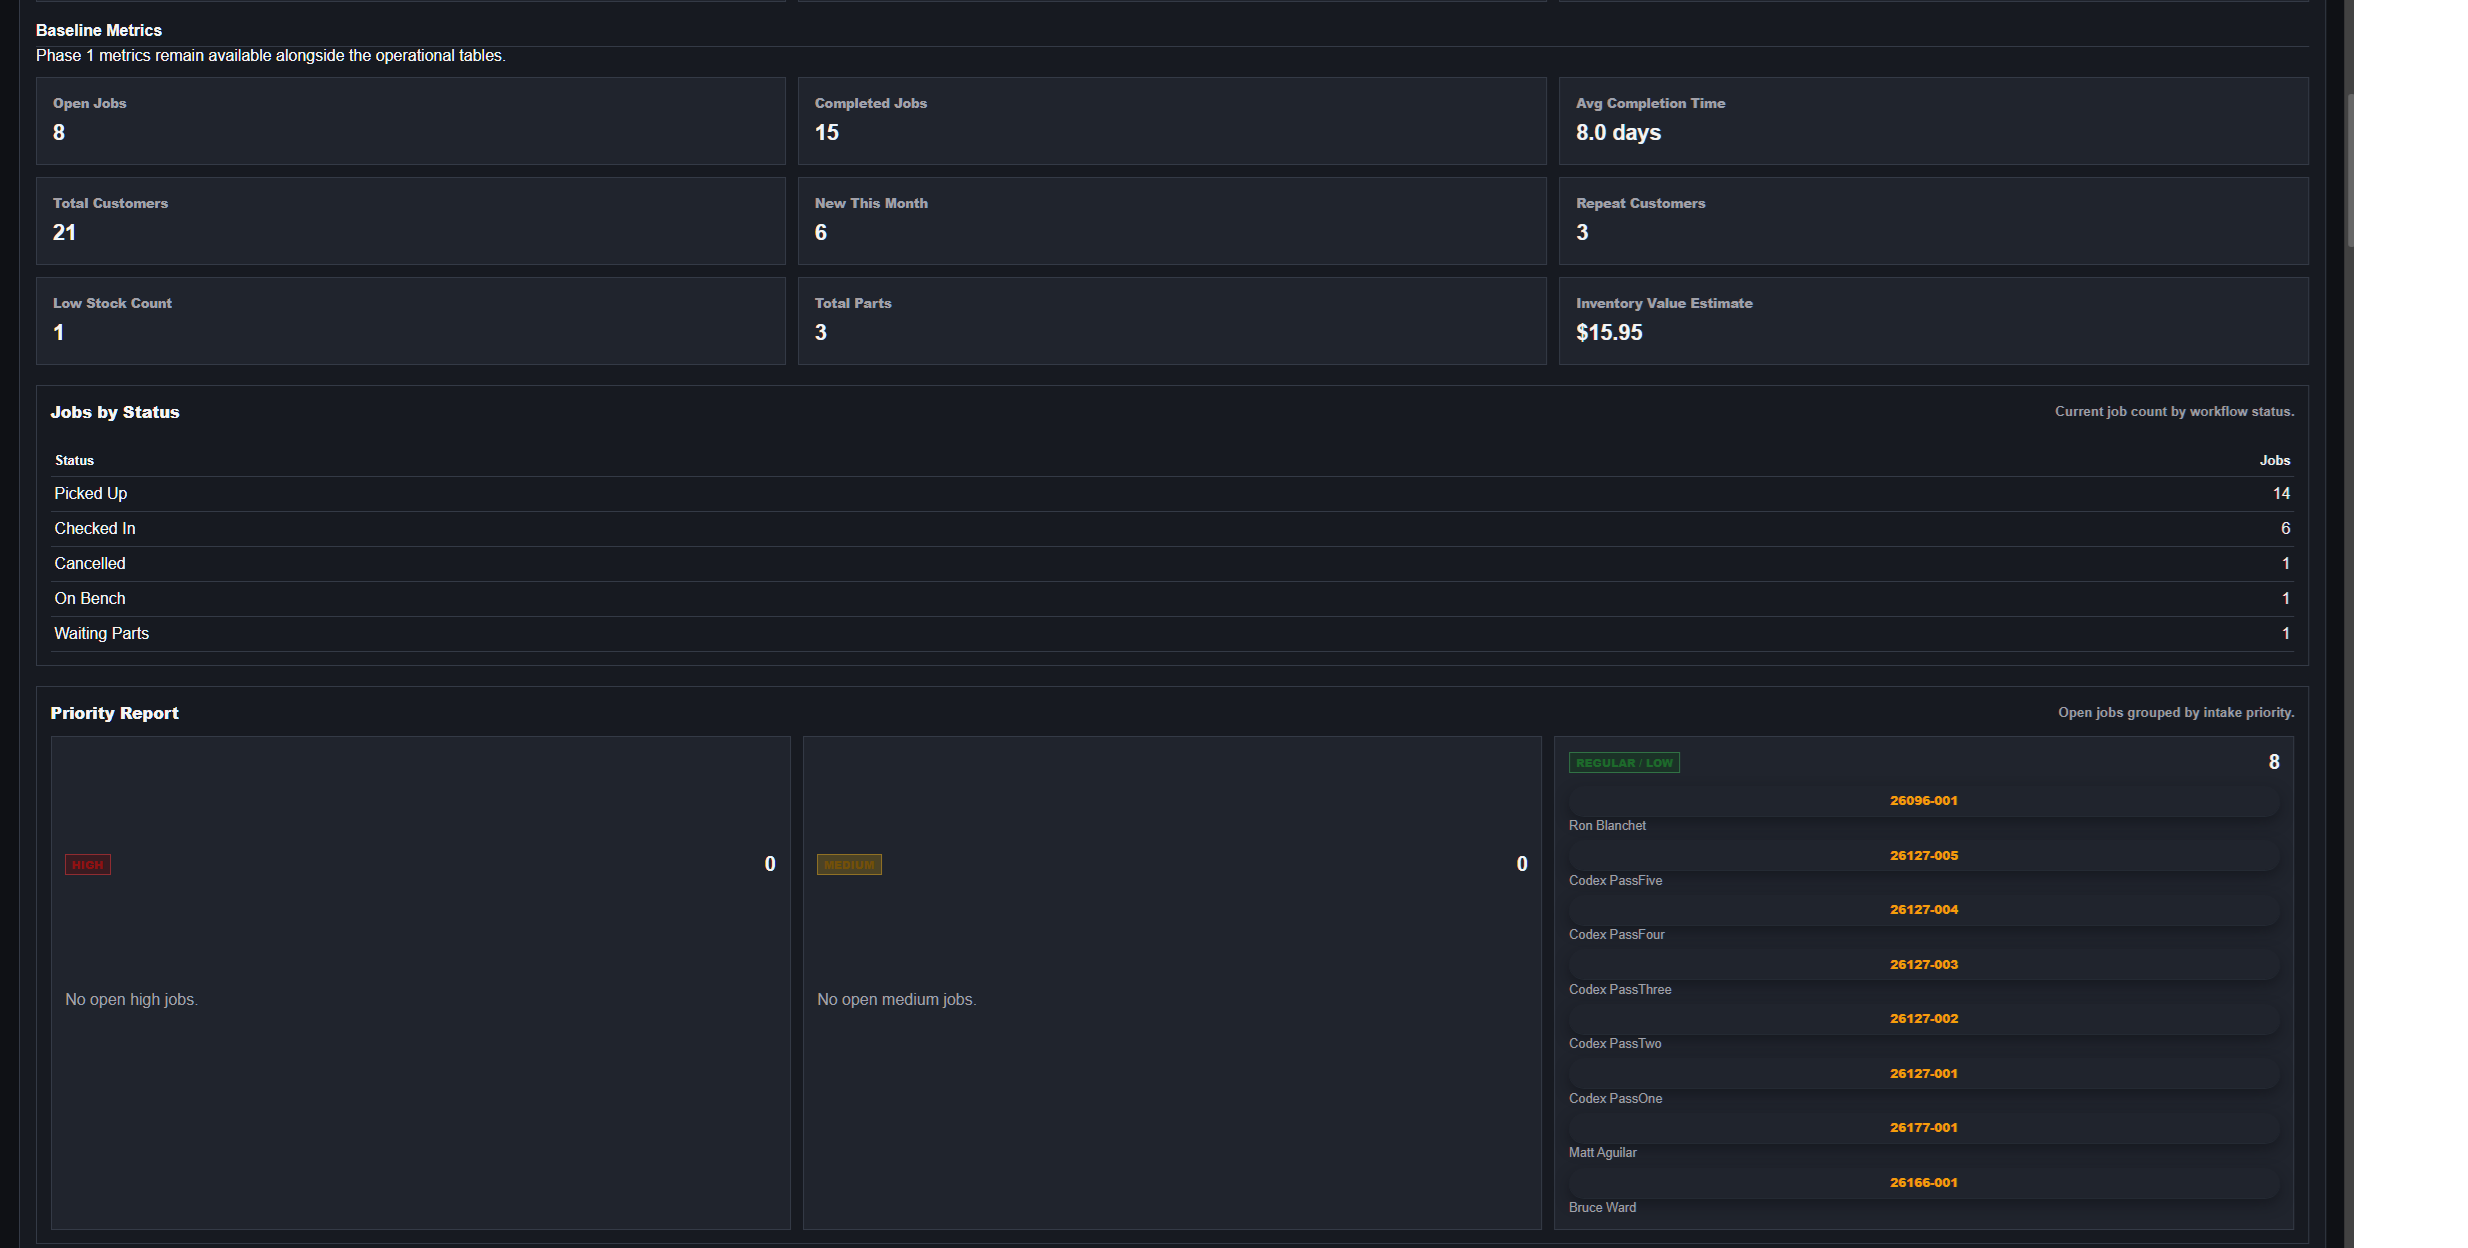
Using report output
- Use filters to narrow the visible rows.
- Print a report page when you need a simple paper copy.
- Export CSV when you need spreadsheet review.
- Treat reports as a shop management aid, not a replacement for bookkeeping review.
Roles and permissions
Roles control what each user can see and change. This protects shop data while letting staff work in the areas they need.
| Role | Typical access | Best use |
|---|---|---|
| Owner | Full shop operations, settings, people, plan status, and workflow control. | Shop owner or primary manager. |
| Admin | Most shop operations and settings. | Manager or trusted staff member. |
| Tech | Jobs, customers, inventory, scheduling, and photos where shop access allows. | Repair technician or bench staff. |
| Viewer | Read-only shop access. | Bookkeeper, helper, or user who should not edit records. |
If a button is missing or disabled, your role, trial status, or plan access may not allow that action.
Billing and subscription basics
FretTrack uses plan access to decide which shop features are available. Public plan wording is Trial, Shop, and Pro. The app can show current plan, trial status, expiration, renewal timing, and locked feature messaging. See the Shop and Pro feature comparison for the current checkmark table, usage limits, and features not yet offered.
Shop
Shop is the paid core workflow for running the repair shop: customers, jobs, photos, work logs, inventory basics, scheduling, team workflow where available, printing, and email documents.
Pro
Pro includes Shop workflow and adds Advanced Reporting, team workflow, Photo Editor, Amplifier Repair, Keyboard Repair, Scheduled Email, Automated Service Reminders, and Loyalty.
Dedicated AmpTrack and MidiTrack add-on modules are planned later with more specialized amplifier and keyboard workflows.
Expired access should preserve data and allow safe viewing, but write actions or upgraded features may be locked until access is restored.
Recommended daily routine
Opening the shop
- Open Dashboard or Jobs and review active work.
- Check Scheduling for pickups, due dates, and blocked time.
- Review waiting-on-parts jobs.
- Review low-stock and purchase order status if you manage inventory.
Closing the day
- Save any open job edits.
- Add work logs for completed bench work.
- Update statuses for ready, waiting, or completed jobs.
- Receive any arrived parts.
- Check that customer pickups or shipments are documented.
Troubleshooting
I cannot save a job
- Check required fields.
- Check your internet connection.
- Confirm your role allows editing jobs.
- Confirm your shop access is active.
- Look for visible save or validation messages.
Inventory did not update
- Confirm the part was selected from inventory.
- Manual parts do not change stock.
- Confirm the quantity change saved successfully.
- Check whether your role can edit inventory.
Photos are not loading
- Refresh the job.
- Check whether the upload finished.
- Try another browser or device.
- Report the job number and photo label if the issue continues.
What to include in a support report
- Screen or page name.
- What you clicked.
- Expected result.
- Actual result.
- Browser, device, and role.
- Screenshot or short video if possible.
Clear reports help problems get fixed faster. Include the job number, customer name, or part name only when it helps identify the issue.